
Cristina118
-
Posts
21 -
Joined
-
Last visited
-
Days Won
11
Content Type
Profiles
Forums
Blogs
Events
Gallery
Everything posted by Cristina118
-
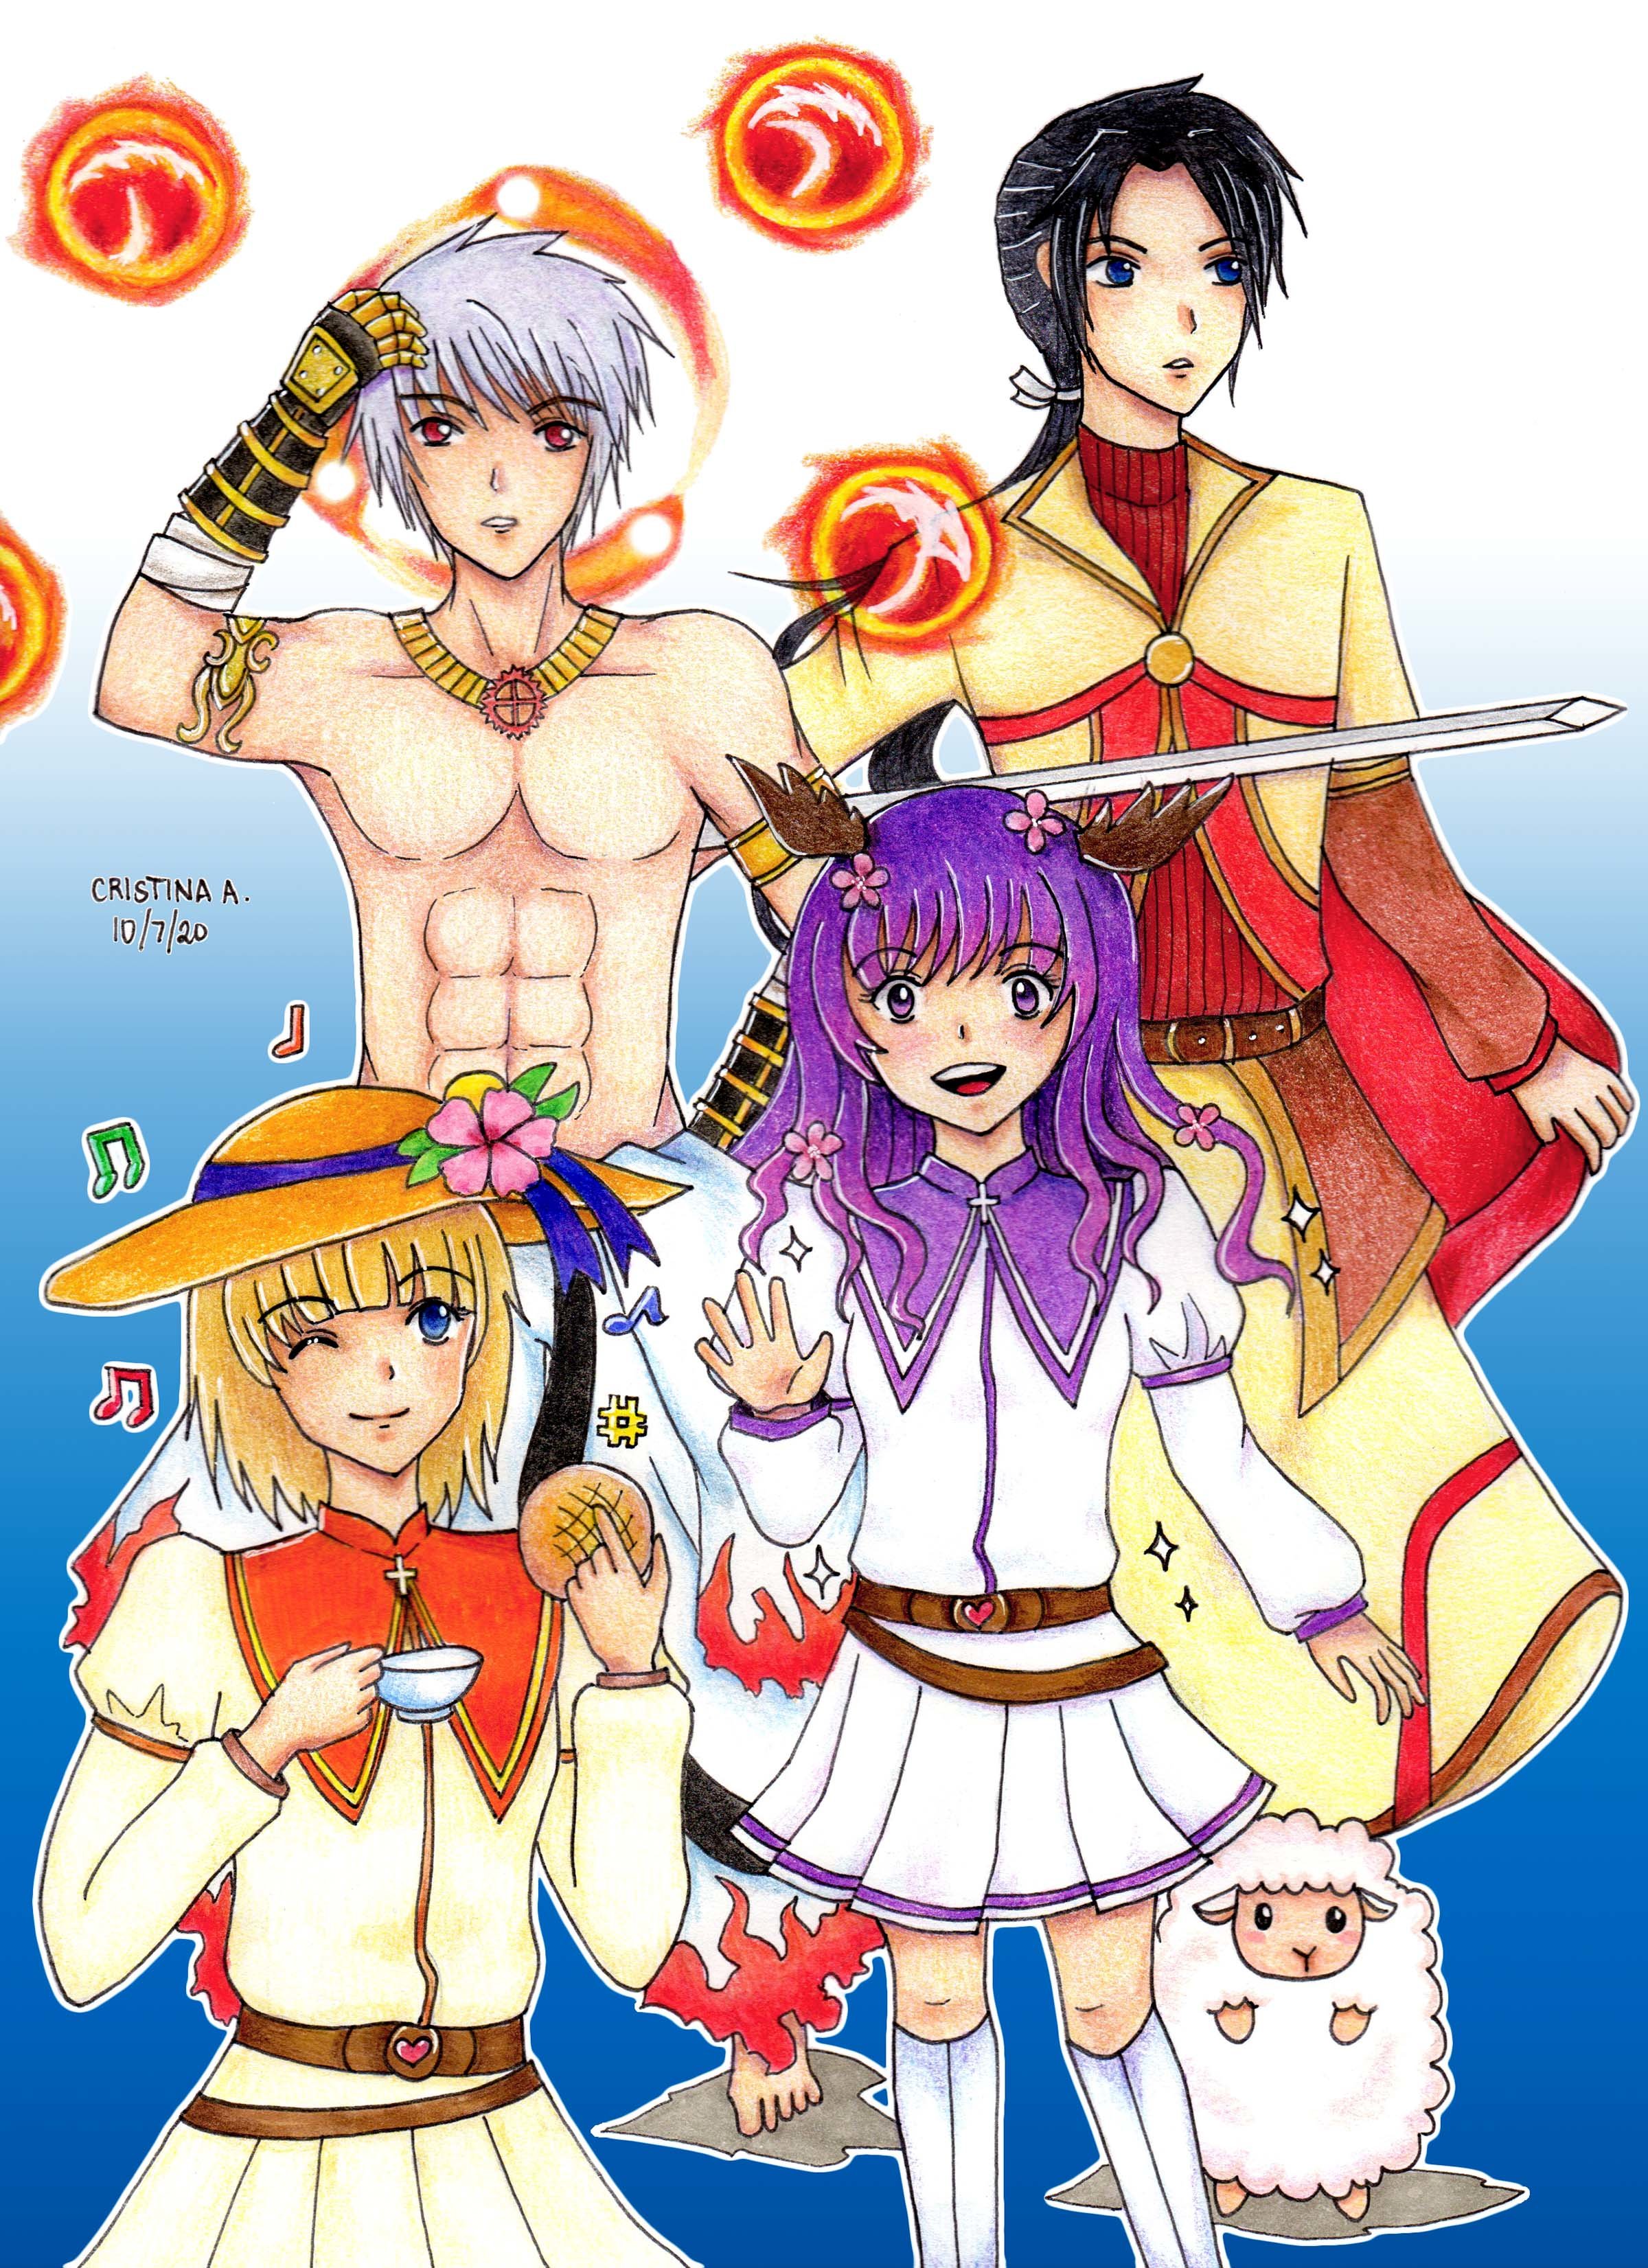
Group Picture IGN: Wafflewich Hope you like it
- 13 replies
-
- 10
-

-
Title: Pancaring Card Category: Card Art IGN: Wafflewich

-

Any tips on leveling up a Priest? im at 170 right now
Cristina118 replied to JCBob's topic in Leveling up discussions
Try geffenia, loot the rings and sell to npc. You may also try cursed abbey, the exp is pretty good, and if you really want to level fast you can try bio laboratory basement but it might be quite hard. You can also try leveling with gramps quest in eden. -
Title: Night at Niflheim Expect the unexpected. Category: Login or Loading Screen Art IGN: Wafflewich

- 33 replies
-
- 15
-
-
Hi Here's my entry, sorry for the terrible quality 😧 Not Nobby IGN: Wafflewich

-
Notoriety quest! (Tier 2) Need help!
Cristina118 replied to olddog's question in Questions and Answers
Muscipular can be found in the field outside ice cave dungeon. Just warp to ica cave dungeon 1 then go outside portal there should be some there and other fields close by. As for the aloe, if you have a biochemist you can create or summon a bunch on plants and kill them to farm it. Or you can ask some friends with biochemists If without, there's a map that spawns just plants in umbala dungeon 3 at the roots of yggrasil. You can warp to umbala dungeon 2 then enter the portal in the center of the map. -
198, 244 Neb Clause
-
Press the small arrow
-
We've been roaming the fields for a while and can't seem to find any pits/rifts
-
Ohhh, good suggestion. I'll include more skills and strategies in an update of the post
-
My final guide for the event
-
Murderous Mystery Mine Guide as Star Gladiator What is the Murderous Mystery Mine? The Murderous Mystery Mine is a custom map of RevivalRo. It contains custom monsters that are slightly stronger than most mobs and is meant for higher levels. The experience gained is quite good and can be used for fast leveling. Not to mention one of the most expensive cards, Teddy Baal Card can be found here. How do I get to the Murderous Mystery Mine? To enter you need to have a Miner Identification Card which you can buy from the Mining Point Shop in the mall for 10 mining points. This Miner’s ID is good for 30 days of unlimited access to the mines. This Miner’s ID can be put in storage and can be used for different characters. To enter the mines, go to Einbech and speak to the Mysterious Miner located a little to the left at 165, 138 Map The map is a mirror of Mjolnir Dead Pit F3 (mjo_dun03). You cannot teleport around the map so it is best to travel in a loop so you don’t miss the mini bosses and mvps. What Monsters are there? Creakyboom Holgar Marlon Pitsqueak Toaster Puff - Mini Boss Bottle of Puff Gas 10% Puff’s Eye 100% Poof - Mini Boss Bottle of Poof Gas 10% Poof’s Eye 100% Hardened Anvil - Mini Boss Anvil Chunk 100% Anvil Chips 10% Apache Tear - Mini Boss Apache Shavings 10% Apache Chunk 100% Teddy Baal - RSX 3.14159 - What can I get there? Most people go here to hunt the card of the elusive Teddy Baal and other mini bosses. However you can also farm Enriched Elunium, Enriched Oridecon, Hardened Steel, Andalusite, and Asteria. The mini bosses also drop materials that can be used to make equipment from the NPC inside. What Equipment can I make? To make equipment you need to talk to the Smithy NPC located in the left side of the map (139,111). You may check this link for the Murdersmith Quest Apache Chunk + Bottle of Puff Gas = Apache Coated Boots Poof’s Eye + Anvil Chips = Poof Eye Ring Puff’s Eye + Apache Shavings = Puff Eye Ring Anvil Chunk + Bottle of Poof Gas = Hardened Steel Spiked Shield All the equipment worn together with the Shoulder Bears and Pi Shell gives a bonus as a set. Also with Miner’s Hat (4) What is the best class to use to farm there? It is recommended to use Star Gladiator. Why? because it is good for elemental melee damage and it's skills are helpful in farming in a single map. Activate Union of the Sun, Moon, and Stars and you’re on your way to farming! “Must Haves” Set one Feeling of the Sun, Moon and Stars on the Map. Activate the heat/warmth you set for the map. This will help you in farming! Taekwon spirit from Soul Linkers or Fable Silk - will allow you to use skill Union of the Sun, Moon, and Stars (Floating/levitation for faster movement) Mild Wind: Fire - Most of the monsters are earth property so it’s best to use Fire elemental attacks. Angra Manyu ---> You won't survive without this. You can, but this makes farming easier. It adds very powerful attack and heals you based on your damage. Full Chemical Protection from Biochems ---> Teddy and Rsx Pi has a Strip Skill Hermes Sandals - Moonlight and Eddga card effect in one equip, this will allow you to roam and hunt bosses faster without flinching. Note: There is a hidden skill Star Gladiator has, its called Solar, Lunar and Stellar Miracle. It doesn’t appear at your skill window nor can it activated manually. Everything the Star Gladiator does has a very low chance to be activated (depends on your luck). Once activated, it will grant you the ability to use all Warmth skills as well as the Comfort skills. It will also give you a huge amount of boost in Attack damage. The effect will be gone, when you either die or change map. Stats Str - Max Agi - Enough to reach 196 ASPD Vit - Enough for some defense Int - Enough for some sp regen Dex Instant cast for Leap, needed for Comfort Skills too Luk needed for Comfort Skills Equipment Angra and Ahura may be used in this map as well as other premium headgears. Upper Premium 4 slot +30 all stats headgear with 4 Experimental Amistr Cards Baphohorn (4) from Vote points with 4 Experimental Amistr Cards Melee RDC Helm with 4 Experimental Amistr Cards Drooping Amistr Middle Fable Silk - with Orc Hero Card 4 slots premium wing with 4 Experimental Amistr (if soul linked) Lower Black or Orange Tie Red Tie/Yoyo Rucksack - with Experimental Amistr Card Armor Great Old Hauberk Garment Great Demon Shroud Footgear Hermes Sandals Slotted Footgear with Ascendant Orc Card Accessories Ring Des Nibelungen - with Ifrit or Hardened Anvil Cards Shield Valkyrian Shield - with Alice Card Antiquated Shield - with Golden Thief Bug Card Weapon Angra Manyu - with 4 Abysmal Knight Cards or 1 Baphomet Card, Turtle General card and 2 Abysmal Knight Cards Thank you for reading! Comments and suggestions are welcome. Happy farming! P.s. Special thanks to nom nom nom ^^ IGN: Breadcrumbs, Breadpan, Wafflewich, etc.
-
Forgot to add the link here XD
-
--- Golden Hole Guide --- --- As Gunslinger --- The Golden Hole is a custom instance that can be repeated and it has a 2hr cool down period. This is a work in progress guide that is not yet 100% complete. Me and my friends have been trying to figure out the instance but not yet sure of everything and are still experimenting on best strategies and equips. However if you wish to try it out here’s a simple guide for you. You may also check out the wiki page Golden Hole for info regarding the instance. Prerequisites: Completion of Kraken’s Lair Completion of Sapha’s Visit Bring Ring of the Ancient Wise King Party: Gun Slinger – Main damage dealer, Spam Desperado skill Sniper – Can also deal damage High Priest – Support Paladin or Professor – Tank Assassin Cross is not recommended as mobs have reflect (unless of course you are not affected by reflect *coughs* teddy baal *coughs*) Equips: Upper Drooping Amistr - for life steal and added damage Premium 4 slotted Upper – with Dark Ping cards Middle 2 slotted Mid (such as Novice wings) – with Gemini Cards Premium 4 slotted Mid - with status resist cards like evil snake lord, marduk, and 2 gemini cards – for anti-stone curse (trust me the Gemini cards will save you all the frustration of getting stone cursed) Lower Black/Orange Tie – with Orc Hero Card Red Necktie/Yoyo Rucksack– with Orc Hero Card or Duneryrr Card Armor Slotted Armor with Evil Druid Card - Anti-stone curse (use with caution, you cannot be revived when you die when using Evil Druid Card) Pragmatists Mail – For higher hit because the mob has high flee Garment Heroic Backpack with Anunaki Card – For Critical Attacks Great Demon Shroud - with Deviling Card Footgear Ebony Greaves with Ascendent Orc Card Antique Footgear with no knockback with Ascendent Orc Card Accessories Recondite Rings - with Implosion Card of Hardened Anvil Card Ring Des Nibelungen Weapon Thanatos Revolver - with Turtle General Cards Stats: Str - 90-100 Enough to carry bullets and Yggdrasil Berries Agi - 140-165 Enough to reach 196 APSD Vit - 100-120 Enough for some defense Int - 100-120 Enough for some defense and sp regen Dex - Max because this is where your damage is based Instructions: Make your way to Manuk and enter the Kamidal Tunnel by speaking to the guard while wearing Ring of the Ancient Wise King. Then go to the center of the map and find Nobby the Novice and the Curious Sapha. You can buy Scaraba Perfume from the Sapha before entering the instance. When you and your party are ready, speak to Nobby and help him find gold. He will warp you to the instance map. Keys: There are 5 keys you need to obtain to complete the instance. Speed - Finish the quest in record breaking speed! Mushrooms – You need to collect all the mushrooms and give them to the Piom Root – After opening all the Sonia ( corals partitions) you need to bring Nobby to the root at the center of the map. (you will unlock “Root of all Evil” title) Queen – Defeat the queen! Nobby can help to tank but he gets distracted and tired easily Nobby – Nobby needs to do the entire thing with you ❤️ He will follow you everywhere and provide some tanking, but is easily distracted and when he gets tired he must stop. Map: The map is a mirror of Scaraba Hole 02, Scaraba Hall (dic_dun02) Nobby – (96, 142) Found in the entrance of the map (near the red dot). The party leader must speak to him to get him to follow. Areas – There are 5 areas divided by Sonia (plant like partitions). You must bring Nobby to the crystal found in each area before you can open the sonia. Crystal - The crystals are represented by red stars. There are 4 in total and a text will appear when Nobby obtains one. Red (85, 219) Yellow (84, 107) Purple (148, 93) Blue (190, 211) Mushrooms – The 12 locations are represented by white crosses. You do not need to bring Nobby to get them. In the 1st area there are 4, 1 in the 2nd area, 2 in the 3rd area, and 5 in the 4th area. 65, 146 99, 195 62, 129 79, 205 28, 96 187, 33 199, 149 179, 210 172, 207 174, 211 174, 201 140 209 Piom – After collecting all the mushrooms return to the Piom (220, 45) to get the key. No need to bring Nobby. Represented by green star. Wear the Ring of the Wise King to talk to him. Root – (70,99) When all the areas are opened, bring Nobby to the roots to get the key. The Root is in the center as represented by the yellow star. Queen – Defeat the queen and finish the instance. She is in the last area (blue star). Nobby will tell you after the quest that he has found a key while exploring the dungeon. Monsters: The mobs are custom gold versions of the Scaraba Hole mobs. They cast a Defender, Quagmire, Pneuma, Kyrie, and Stone Curse. One of their skills is Heaven’s Drive so earth property resist equips are also recommended. The eggs are not aggressive but you must kill them because Nobby gets distracted. The Queen spawn minions. Nobby can help tank the queen but he gets tired. Consumables: Yggdrasil Berries – Bring lots, I recommend about 100+ Yggdrasil Leaf – For resurrecting your party members Token of Siegfried – In case you die Reraise Potions – In case you die Speed Potions – because quagmire makes you slow Ammunition – Fire Bullets Tips: Kill all the eggs! Nobby gets easily distracted and will attack them. No need to kill all the mobs, as they respawn slowly. You can leave a party member near the Piom so the whole party does not need to return when all the mushrooms are collected. This is a timed instance, so it’s best to do everything you need to do with Nobby first, then when he gets tired, do the other things. Be patient with Nobby, he gets distracted, casts first aid a lot and generally causes a lot of stress! He gets tired and you need to wait for him to breathe. I believe the instance can be done solo, but it’s more enjoyable with more members. Rewards: Keys are related to what kind of rewards you will get: Belly Button Ring Clip-on Fringe Gold-flaked Alcohol Golden Apple Gold Scaraba Lure Golden Crown Dragon Helm (Gold) Golden Coat Gold-laced Hood Gold Soles Golden Plate Gold Hammer Gold Lance Gold Bidenhaender Golden Drills Gold Plated Bow Orbaton Gold Scaraba Card Gold Queen Scaraba Card Jimbo the Novice Card You can also get the title [Root of All Evil] Thank you for reading! Special thanks to SugarFree and to my friends who did the instance with me and helped write the guide. If you feel like adding something or there is something to be corrected in the guide kindly notify me. IGN: Wafflewich, Breadpan, Breadstix, Etc.
- 1 reply
-
- 2
-
-

-
- golden hole
- gold scaraba
- (and 1 more)
-
Hi, please check out my new guide when you have the time
-
RDC Tier 4: ESCAPE THE ROOM As Sniper Escape the Room is a part of the quests in the Royal Dispatch Operations Tier 4. For more information you may check out the post here: https://community.ragnarevival.com/index.php?/topic/1212-new-royal-operations-emperors-assassination-escape-the-room-and-demonbusters/ Requirements: · Completion of RDC Tier 1-3 · Party of 5-8 members · 3 Operation tickets per party member Party: Having a complete party is recommended for the quest · Snipers as hitter · Professor or Paladin as tank · High Priest for buffs and status recovery · Whitesmith for buffs and weapon repair Stats: For Snipers: STR – 100-150 Enough to carry arrows, potions, and loots AGI – 100-120 Enough to read 196 ASPD, remember you have sniper buffs, be sure to factor it in VIT – 81-100 Enough for defense and for Gemini –S58 to effect INT – 100-150 Enough for defense against magic attacks DEX – 255 Max, the more the better, as this is where your damage comes from Equipment: Upper Drooping Amistr – because you have life steal and additional damage Slotted Headgear with Nightmare Card for sleep immunity 2 Slot Headgear such as Bunny Balloon Hat, Chung Hairband, with 2 Gemini-S58 Cards Middle Note: If you put anti-sleep in upper don’t put in mid and lower Large Red Angelwing – with Nightmare Card or other Slotted Mid with additional attack – with Nightmare Card or other Lower Black/Orange Tie – additional attack Froggie Rucksack Armor Great Old Hauberk – for immunity to freeze Pragmatists Mail with Marc Card for immunity to freeze status and increase in Hit Garment Alligator Leather Cloak Heroic Backpack with Anunaki Card Footgear Alligator Leather Sandals Ebony Greaves, Fey Boots, Footgear Antique with Ascendent Orc Card or Nekoring Card Accessories Recondite Rings – with Implosion Cards you may add additional Dex+3 orbs Ring Des Nibelungen or similar that adds attack +5 Zircon Ring - for additional Hit *Do not wear accessories that casts Tarot Card of Fate, one time the boss was teleported to another room and we could no longer finish the quest, I believe this has now been fixed Weapon Goblin Bow – with 2x Turtle General Card or Aunoe Cards Thanatos Bow – with 2x Turtle General Card or 2 Abysmal Knight Cards Spectral Bow – 2x Abysmal knight, Turtle General Card, Randgris Card Consumables: Yggdrasil Berry – For Hp regen Blue Potions – For Sp regen Stone Quiver - At least 10 Abrasive – If you have, to add crit Yggdrasil Leaf - To resurrect party-mates Reraise Potion Map: Red indicates the spawn point. Yellow indicates the crystals you must find and Blue is the final crystal where the boss spawns. How To’s: For this quest you must find the Crystals and defeat the Boss. Yes, it is that simple. You and your friends are lost in the maze and need to find the crystals to get out. The maze is confusing because there are a lot of portals to enter and you can easily get lost. 1. Finding the Crystals - To get crystals simply click on it to activate the dialogue. There are 4 in total to find. You may choose to assign only one party member to look for the crystals, or you can all go together ❤️ Portal Directions: For Party Leader (or the one assigned to look for the crystals) From the Start> Right> Left> Up> Up> Down> Right> Left> Left> Up> Down> Down> Down 2. Get out of the Maze - go to the last room, where the MVP spawns. For the rest of the Party From the Start> Right> Up> Down> Down> Down Note: Ignore the cute and annoying mobs, killing them is pointless as it just takes time. 3. Speak to the last Crystal - Before the boss spawns the whole party must be at the last room and the party leader must speak to the last crystal. 4. Defeat the MVP – employ all means necessary to kill it and claim the prize! As a party, the strategy recommended is to have your Tank distract the MVP while the other members hit and others provide backup. Strategies: Better to have Full Chemical Protection from Biochemist as equipment do tend to break, other-wise bring a Whitesmith or Weapon Repair Scroll It is also good to bring a high priest to cast status recovery on party members Stay awake, bring nightmare card and coffee If you miss, cast True Sight and wear Pragmatist Mail Prizes: Costume: There is… Something… Ghostly Moss Holy Celestial Axe Erebus’ Curse Bagh Nakh Elemental Converters, Food Box and Etc. Special thanks to my friends for helping me run RDC quests. Thanks to Zach who keeps tabs of which portals to take. Thanks also to those who helped in writing this guide . Comments, suggestions, and clarifications are welcome. Have fun! Ign: Wafflewich, Breadpan, Yummy, etc.
- 1 reply
-
- 2
-
-
-
- escape the room
- rdc tier 4
- (and 1 more)
-
Hi I made another guide. Please check it when you are free
-
Hall of Abyss Farming Guide as Stalker The Hall of Abyss is a map that uses guild point system to allow the purchase of equipment. This means that you kill the monsters in the map to demonstrate your ability and gain points that you can use to buy equipment. For more information you may check out the guide in the wiki page: Hall of Abyss Stalker is a fun and exciting job as they are very versatile and can use different types of weapons and strategies both in PVM and PVP. As a stalker, you can use weapons, such as Daggers, Swords, Bows, and Shields. You also have the skill to copy by using Plagiarism and Preserve. If you want to experiment with different builds and skills, this is the job for you. It’s the jack of all trades when it comes to skills and weapons. I’ll admit, I’m not super knowledgeable in utilizing all the builds but I want to share how fun it can be and leave you to experiment. You may check out other guides for builds which I will post after this guide for more information. IGN: Breadpan, Yummy, Breadstix, Loafy, etc. A. Magic Type Build Magic type build for stalkers is quite good and challenging. They are not as strong as a wizard but can use different tactics to their advantage. This build just demonstrates how versatile stalkers can be. You will however, need to copy and Plagiarize and Preserve some magic skills for your wizard friends. Skills to Copy: Storm Gust – Level 10 - easier to cast and has a large area of effect Jupitel Thunder - Level 10 - focused on one mob at a time Crimson Fire Blossom -Spammable fire elemental magic First wind -for Payon, has AoE effect Stats: Str – 100-150 For carrying potions because you will need more of it Agi – 100-150 For movement speed Vit – 100-150 For defense of attacks Int – 255 Max, the more the better, because this is where your magic comes from Dex – 150 for instant cast of spells Equipment: Upper 2 Slot Headgear such as Bunny Balloon Hat or similar with 2 Rata Cards Satin hat / Flax hat / Cashmere hat Magical Feather - additional matk, can be obtained with this quest RDC Helm with stats for Magic Builds (Int and Dex) with 4 Rata Cards 4 slot Premium Headgear, all stats +30 with 4 Rata Cards Middle Large Blue Angelwing – with Orc Hero Card as you can easily be stunned by sonic blows from mobs Golden Wings Slotted Mid with additional Magic Attack such as Icicle Wings with 1 orc hero and 1 marduk card, you may also put Orcish Spirit Card for Ninja 4 slot premium headgear all stats +30 with 4 Rata Cards Lower Black/Orange Tie – additional magic attack Honorary Bunny Mouth – immunity to silence Blue Necktie with Rata Card / Orcish Spirit Card( for ninja skills) Premium +15 stats Armor Great Old Hauberk Armors from Tailoring such as Satin, Cashmere, or Flax Garment Great Old Cloak Garments from Tailoring such as Satin, Cashmere, or Flax Heroic Backpack with any card such as Raydric Shield Valkyrian Shield or Antiquated Shield with Alice Card Footgear Great Old Boots Slotted Footgear with Fallen Bishop Hibram Card (for damage against demi-human), Dark Lord Card (autocasts Meteor Storm), or Kiel Card (faster casts) or Moonlight Flower Card (faster walking) Tenebrous Boots – 7% Matk Accessories Resplendent Rings– with Scaraba Card Ring Des Nibelungen or Seth’s Wrath or similar - with Scaraba Card +5 Sapphire Ring Slotted accessory with Sewer Bug Dame Card to enable the use of Warp skill Weapon Creakyboom Card – 4% magic attack +10 Black Wing with card above 3-4 slotted Sword or Axe with 3-4 card/s– Just because it has slots Faceworm Leg with Creakyboom -10% matk Elemental Sword – 3 slots Which Hall of Abyss: I believe the best Hall of Abyss for magic type users is the Ancient Wind, located in Payon, Greenwood Lake (pay_gld): 206, 190. It is not as spacious as the other maps perfect of cornering mobs and hiding. The map is a mirror of gld2_pay. Strategies: Make your way to the Hall of Abyss and start killing the mobs like Skeleton General, Am Mut, Gajomart, PIamette, Soheon and Daehyon with magic attacks. For this guide I’m featuring the use of Storm Gust. You can make use of other skills like Jupitel Thunder, or ninja skills like North wind. The strategy is to cast storm gust and make the monsters chase you while they go through it. Do this multiple times by running around all over the place. When you are getting mobbed it’s best to use backslide and live to fight for another few minutes. When you are low in SP and HP, sit in a corner to regen as you do not have the life-steal. Be sure you pick up the authoritative badges (alootid 662 & 12262) Soheon drops, it comes in handy in increasing your movement speed. Be patient and after a while you will get the hang of it! Storm gust! Freeze those pesky mobs! Chilling for hp regen B. Bow Type Build Bow type build for stalkers is also very effective and fun to experiment with because you can play around with skills. They are not as strong as Snipers when it comes to ranged damage but is still very viable. You can also add additional range damage for stalkers by adding skill points to Vulture’s Eye to increase your range and hit rate. Even though you do not have a falcon, you can use other skills to deal damage and annoy opponents. Imagine using the bow, but being able to switch weapons to strip enemy armor, or having a fast get-away using backslide and chase walk/ stealth. You can also make use of copying the right skills from other jobs such as Storm Gust, Bowling Bash, Grand Cross, etc. Skills Needed: Vulture’s Eye – Level 10 – for additional range Double Strafe – Level 10 – for sniping mobs Reject Sword - works on monsters too Raid – Level 10 – for crowd control Skills to Copy (you may copy only one at a time): Bowling Bash – Level 10 – equipping arrows of different elements can change the element of your attack Storm Gust –Level 10 – for additional damage,good for halting and crowd control too Other skills you like Stats: Str – 100-150 Enough to carry arrows, potions, and loots Agi – 120-160 Enough to read 196 ASPD Vit – 100-150 Enough to survive and not be like paper Int – 100-150 Enough for defense against magic attacks Dex – 255 Max, the more the better, as this is where your damage comes from Equipment: Upper Drooping Amistr – The best because you have life steal and additional damage 2 Slot Headgear such as Bunny Balloon Hat or similar with 2 Dark Pinguicula Cards RDC Helm with 4 Dark Pinguicula Cards 4 slot Premium Headgear, all stats +30 with 4 dark Pinguicula Cards Middle Large Red Angelwing – with Orc Hero Card Slotted Mid with additional attack 4 slot premium headgear all stats +30 with 4 Dark Pinguicula Cards Lower Black/Orange Tie – additional attack Froggy Rucksack Red Necktie Premium +15 stats Cards: Kiki Card - for more crit Armor Alligator Leather Suit Great Old Hauberk Garment Alligator Leather Cloak Heroic Backpack with Anunaki Card Footgear Alligator Leather Sandals Ebony Greaves with Ascendent Orc Card or Nekoring Card Fey Boots Accessories Recondite Rings – with Implosion Cards you may add additional Dex+3 orbs Ring Des Nibelugen or similar that adds attack Slotted accessory with Sewer Bug Dame Card to enable the use of Warp skill Weapon Goblin Bow – with 2x Turtle General Card or Aunoe Cards Thanatos Bow – with 2x Turtle General Card or 2 Abysmal Knight Cards Spectral Bow – 2x Abysmal knight, Turtle General Card, Randgris Card Which Hall of Abyss: For Stalkers with bow type build you may want to try the Hero’s Tears, located in Aldebaran (191, 162) Why? Because there are lots of open spaces, perfect when you need to get away. Mobs here are easier to kill with bows. The map is a mirror of gld2_ald. Strategies: Make your way around the map killing Gioia, Elvira, Centipedes, Owls, Piamette, and Hornets. Bring Stone and shadow arrows. The Hall of Abyss mobs are thana-bait, meaning the higher the vit the more damage you will do to them using Thanatos weapons. Switch to Shadow Arrow when faced with Elvira and Gioia and Stone Arrow for the rest. When you are getting mobbed proceed to use crowd control skills such as Storm Gust and Bowling Bash to knockback enemies and make a quick escape using backslide. Sadly Chase Walk is not as effective here as the Hornets and Centipedes will still detect you. Drooping Amistr is your best friend! The more you attack the more chance you get healed with life-steal. Keep killing and gaining points, you will get the hang of it in time! Set (@autoloot 1) and add the following to alootid; Royal Jelly (ID 526), Gold (ID 969), Green Herb (ID 511) What to Farm for: Since the Hall of Abyss uses guild point system you will need to accumulate points by killing mobs in order to be able to buy from the TAGRAS shop. You can check this link to the TAGRAS Catalogue. The following are my recommendations from the list: · Saint Vincent’s Saber - You’ll never know when you want to be a sword swinging stalker instead, it also has life steal which is always useful for close range combat · Reset Girl’s Robe – All around armor · Healer’s Heart Hat – 10% Demi-Human Resist Consumables: Panacea - to remove poison and curse Green Potions/Green Herb – to cure poison (faster than Detoxify) Blue Pots – for sp regeneration Condensed white potions – for hp regeneration Speed Potion – for fleeing mobs Blue Gems - for warping yourself HOA Etiquette: Remember that HOA is a PvP map. Avoid killing other players and apologize when you do. Also avoid kill stealing mobs of others. Additional Guides: https://strategywiki.org/wiki/Ragnarok_Online/Jobs/Stalker http://write.ratemyserver.net/ragnoark-online-character-guides/stalkerrogue-guide-mostly-stalker/ Thank you for reading the guide! Thank you to my friends who answered my questions about equips and to the ones who helped write the guide (thankies for corrections and linking hehe)! Comments and suggestions are welcome. If you think there are better builds, equips, and strategies, feel free to comment and we can discuss as I would also like to learn more. Happy Farming!
- 4 replies
-
- 5
-
-
-
- stalker
- hall of abyss
- (and 2 more)
-
Hi friends made a Mining Point hunting guide. Kindly check it when you are free
-
Yummy’s Mining Point Hunting Guide Are you bored and in the mood for adventure? Does the sound of a game-wide treasure hunt make you curious? Or did you stumble upon an unknown object that looks like a Mineral and acts like a mineral but has a different name? Look no further, because this is the guide for you! This is a simple guide to Mining Points. You can also check out this wiki link: https://wiki.ragnarevival.com/wiki/Mining_Points. Happy hunting! IGN: Yummy, Wafflewich, Breadsitx, Breadpan, etc. What is a mining point? A Mining Point (NPC) appears in dungeons all around the game. When mined, a Mining point can either have a value of 1 or 2 points/tokens. It looks like this: Mining points look like Minerals, Don’t get confused! Where can I find Mining Points? It can appear in any dungeon but not in towns or fields or instances. It appears every ten minutes on Loki server. This means that for every 10 minutes there is a mining point spawned somewhere. Mining Points can spawn regardless of how many there are around the server. This means there can be multiple Mining Points in a single dungeon map. We adventurers must find them and get cool prizes! How to farm/get Mining Point? Mining Points are mined using a Mining Pickaxe. You can buy one at your local tool dealer or at the cash shop. When you have a Mining Pickaxe simply click the Mining Point and it will disappear and a text will appear saying that you have successfully mined the point. The Mining Pickaxe can be used multiple times as long as it does not break. If it does break, because those mining points can be hard to get, you can buy more or bring extras. You do not need to equip the Mining Pickaxe to obtain the point. You can also buy a Sturdy Mining Pickaxe from the cash shop. Where can I spend my Mining Point? You can use the points to buy from the Mining Point Shop located at the north side of the mall (@go16 / @go mall) What can I get from Mining Points? You can get the following items from the Mining Point Shop: Aesprika Box Aspersio Scroll Box (10) Bloody Branch Blue Necktie Box Brynhildr Box Bubble Gum Box (10) Butterfly Blessing Box Character Storage Ticket Enriched Elunium Box (10) Enriched Oridecon Box (10) Field Manual Box (10) GM Poring Egg Box Hard Hat Box Hillslion Egg Box Hunter's Clip Infinite Fly Wing Box Merchant's Clip Miner Hat Box Miner Identification Card Box Premium Item Exchange Coupon Red Necktie Box Sheep Rucksack Box Third Job Packet Yoyo Rucksack Box Can I sell my Mining Point? Some people try to sell mining point locations to others, be careful though! Some items obtained from mining points are tradable when they are not yet open. These you can sell. Make sure to read the description first! Jobs: Best jobs to use include the following, but you can really use any character you want. High Priests – have the ability to teleport, can cast Increase Agility for faster walking. Kyrie Eleison is also convenient for avoiding mobs Champions – can teleport and body relocate for faster hunting Assassin Cross and Staker – for fast movement using back slide Star Gladiator – can sprint and leap Lord Knight - rides on a pecopeco for fast walking Equipment: Upper: Headgears that grant the use of teleport such as Valentine’s Topper, Gent Hat Headgears with additional movement speed like Pecopeco Headband Middle: Mid headgear with increase movement speed such a Mini Love Clips, Valhalla Idol, Fluttering Butterflies, Decayed Hope Lower: Messenger Bags from Hermes Holiday – to increase movement Speed Skeleton Rucksack and Bunny Rucksack Foot gear: Slotted footgear such as Ebony Greaves, or Antique Footgear, with Moonlight Flower Card. Accessories: Slotted accessory with Creamy Card for teleporting Consumables: Flywing – To teleport Infinite Flywing – Obtained from mining points or pancakes, infinite use and storage-able for teleporting infinitely Blue Potions - When using skills like backslide, body relocate, etc. Others - Coffee, a lot of free time, and patience Strategies: Figure 1 - The narrow winding map, it is better to roam the map than to teleport (using either fast walking characters or Backslide or Monk using Body Relocate). Suggested Job: Lord Knight, Monk (body relocate) or any fast walker Figure 2 - The Random Jump-Walk, some maps are difficult to route and too irregular for Assassin’s backslide. On these maps, it is better to teleport then walk. Suggested Jobs: Priest/Monk with teleport or any character Figure 3: These Maps are Made for Backsliding - this maps are straight with very minimal turns. Best for assassins to just backslide. Suggested Job: Super Novice *wink* and Assassin There are other map types and the strategies will be a combination of the ones stated above. The trick is to use a specific job for a specific map (Maximum coverage), or use a character you are really comfortable using and apply the strategies that best suits you. Tips: For Mining Point hunting, the idea is to cover as much ground as possible in a short amount of time. This is why it's best to use characters that can move fast and can teleport. For smaller maps, you may plan out a route that lets you see the whole map so you don’t miss any corners. For larger maps, best to teleport around, but it is possible to miss Mining Points. If you are a donor you may also use @jump to teleport around the map. It’s better to have a hunting buddy to pass the time, you can chat while looking for MPs or be competitive and see which one finds more points! Remember to enjoy the game! Special thanks to my friends who helped in making this guide and to my mining point hunting buddy Comments, suggestions, clarifications are welcome!
-
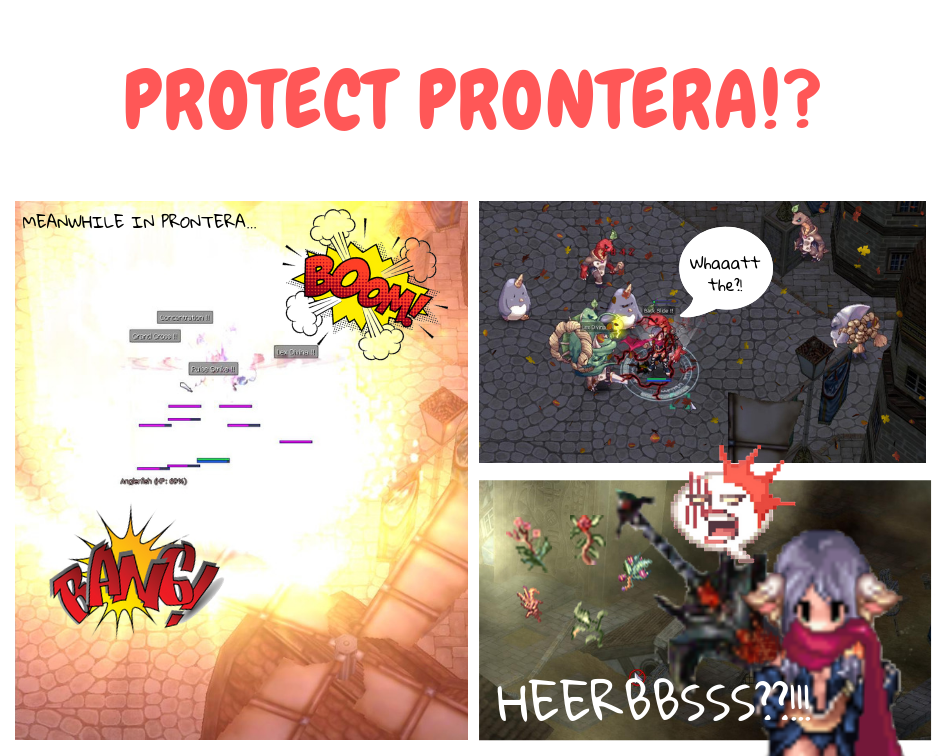
Hi friends! Here's my take on the Prontera Invasion. Please like IGN: Breadstix

- 19 replies
-
- 13
-
-