
gcq
-
Posts
323 -
Joined
-
Days Won
52
Content Type
Profiles
Forums
Blogs
Events
Gallery
Everything posted by gcq
-
... You just made it a instance with that cool down haha Idk if that helps. In all honesty. I always bashed last year's castle for giving me ptsd. Last year's instance in itself WAS OK. The only thing that ruined it was the loot rates. If you just had fix loot rates and adjust it to currents list, it had been all fine.
-
Sooo after the Halloween event finally arrived and had an amazing start, it's time to drop some improvement suggestions. First of all tho I wanna say, this is bit to bash on Kitty or the GMs for doing crap. I know they had the best intend with doing something else then the every year trick or treat and scripting is hard. I understand that. What I don't understand and where my empathy ends is the execution in this whole scenario. Things I have heard/read since the event started and that in my opinion need improvment: - REMOVE @jump, on all maps (should be self explanatory ... I'm still astonished it is allowed) - REMOVE Back slide, Relocation, Leap and Run. We had that issue in the invasion, it gives too much disadvantage. - ONE IP per maps. People camp with alts. It's sad for one household users but they can give their thanks to the alt users. Now there things I am not sure yet how to improve but. There spawns one pit per map every 15min. ONE. MOTHER. F***ING. PIT. (sorry for the language but it still bothers me so much) Make it at least 3 per map I had said. Also i had said 15min waiting for the next pit is a bit long. We need to consider people have a life. Work, chores to do. Not everyone has time to sit there wait for spawn and then race to the pit, just to see it's taken and then wait again. In general I'm not sure if this "race" like nature is that good for a event. Events are suppose to be fun, marathons are not. At least not for me. Anyways, rant mode over. Tell me your thoughts guys. May be I'm just over dramatic again. Kthxbai.
-
@Nebula On a positive note, maybe to solve issues Tea addressed: - disable jump on all maps to remove donor advantage - auto teleport the whole party in the pit if they are in the field
-
When you want encourage party play and end up encourage solo play- a summary. EDIT what i so far not really understood -i write this only from what I read/heard- ... only the pit starter can loot? What's the point of a party if there is only one loot. Nvm my loot ask, someone already got all, can't be that bad
-
- now is done for sure :v -
-
========== "Psssht - You want some drugs?" Creators ... and you ========== IGN: yandereQueen, g c q, Scilla, Shikabane no Odori and many more ========== Overview ========== Creator or also called Biochemist is the alternative path a Merchant can choose if he don't want to be a Whitesmith. Creator can craft all kinds of Potions, but are also pretty neat in combat or giving their Party handy buffs. Furthermore, they even have access to their own little "slave". ~ ========== Skills ========== -- Values on the skills always be on max level of that skill, if not stated otherwise. -- First Class, Merchant Enlarge Weight Limit (Lv10) - Increases the maximum weight limit +2000. Discount (Lv10) - Decreases the price of items sold by NPC by up to 24%. Overcharge (Lv10) - Increase the amount of Zeny you get by selling items to an NPC by up to 24%. Pushcart (Lv10) - Lets you rent a Cart, which provides additional storage (100 slots, 8000 weight). Can be accessed via Alt+W. Also gives you back movement speed depending on the Lv of the skill. Carts can be rent on Rental NPC in Prontera [/navi prontera 125/199]. If you remove your Cart while items are in there, you won't lose them. You can access them again when renting a Cart again. Vending (Lv10) - Lets you open an Vending shop on allowed maps. Can sell a max. of 12 items at once. Requires to have a Cart active. Item Appraisal (Lv1) - Identifies an unknown Item. Mammonite (Lv 10) - Dealing high damage (up to 650% ATK) with an single blow, Consumes Zeny to use the attack (up to 1.000 Zeny per strike). Loud Exclamation (Lv 1) - [Platinum Skill], Adds STR +4 for 5 minutes. Change Cart (Lv 1) - [Platinum Skill], Lets you change the appearance of your Cart depending on your BaseLv you can unlock different looks. Purely cosmetic. Requires to have a Cart active. Cart Revolution (Lv 1) - [Platinum Skill], Hits Target with a small AoE (3x3) around it. Deals ATK*150% Neutral damage. Enemies are pushed back 2 cells. Items in your Cart increase the damage to up to +100% (1% for every 80 weight in the Cart). Requires to have a Cart active. Transcendent Class, Creator Learning Potion (Lv 10) - Increases effectiveness of Potions -healing effect (up to 50%) and the success rate when creating them (up to 10%). Pharmacy (Lv 10) - Enables you to create Potions. Requires the correct Potion Creation Guide for the item you want to make. Increases success rate when creating potions up to 30%. NOTE: Baby-Alchemist/Creator have a -30% rate. Requires a Medicine Bowl. Axe Mastery (Lv 10) - Increase damage with Axe Weapons by ATK +30. Plant Cultivation (Lv 2) - Has a 50% success rate on summoning an Mushroom or Plant. Lv 1 lets you summon a Mushroom (Red, Black), Requires Mushroom Spore. Lv 2 lets you summon a Plant (Red, Yellow, Blue, Green, Shining), Requires Stem. Disabled in WoE. Chemical Protection Helm (Lv 5), Chemical Protection Shield (Lv 5), Chemical Protection Armor (Lv 5), Chemical Protection Weapon (Lv 5) - Protects an Helm or Shield or Armor or Weapon part from damage (Breaking or Divest) for an set duration. Each Skill Requires 1 Glistening Coat. Full Protection (Lv 5) [short: FCP or CP] - Protects Target with all 4 Chemical Protection effects at once for an set duration. Requires 1 Glistening Coat. Summon Marine Sphere (Lv 5) - Summons an Marine Sphere (id 1142) to the Target cell. Sphere will cast Self-Destruct when receiving damage. Requires 1 Marine Sphere Bottle. Bio Cannibalize (Lv 5) - Summons an Plant Monster to the Target cell. Skill Lv affects the summon Monster. Lv 1 - Up to 5 Mandragora (id 1020); Lv 2 - Up to 4 Hydra (id 1068); Lv 3 - up to 3 Flora (id 1118); Lv 4 - Up to 2 Parasite (id 1500); Lv 5 - 1 Geographer (id 1368). Requires 1 Plant Bottle. Demonstration (Lv 5) - Sets Target Area on Fire (3x3). Can reveal hidden Enemies. Damaging Enemies (ATK 350%) and has chance on breaking their Weapons (5%). Requires 1 Bottle Grenade. Acid Terror (Lv 5) - Damages the Target (ATK 500%) with the chance of breaking their Armor (13%) and inflict Bleeding (15%). Has the same property as your Weapon. Requires 1 Acid Bottle. Acid Demonstration (Lv 10) [short: AD] -Damages Target (50% on other Players) with up to 10 consecutive hits. Targets VIT increases the damage. Attack is always Neutral. Chance of breaking their Weapon and Armor (10%). Requires 1 Bottle Grenade and 1 Acid Bottle. Potion Pitcher (Lv 5) [short: PP] - Throws a Potion at ally or yourself (or your Homunculus) to heal them with x% effectiveness of that Potion. Skill Lv determines the effect, can be selected. Lv1 - uses Red Potion (110%); Lv2 - uses Orange Potion (120%); Lv3 - uses Yellow Potion (130%); Lv4 - uses White Potion (140%); Lv5 - uses Blue Potion (150%). Stacks with Healing Bonus like INT, VIT, Increase HP/SP Recovery and Learning Potion. Heal bonus is halfed. Slim Potion Pitcher (Lv 10) - Consumes 1 Condensed Potion to heal all Party members in a 7x7 AoE around the Target. Lv1 ~ Lv5 - Condensed Red Potion (150%); Lv6 ~ Lv9 - Condensed Yellow Potion (190%); Lv10 - Condensed White Potion (200%). Healing effect diminishes the more Targets are Healed. Heal bonus is halfed. Homunculus Related Skills Bioethics (Lv 1) - [Platinum Skill], Enables you to create a Homunculus. Call Homunculus (Lv 1) - Lets you call an existing Homunculus. First call Requires 1 Embryo. Rest (Lv 1) - Vaporizes Homunculus. Resurrect Homunculus (Lv 5) - Revives Homunculus when it got killed in battle. Soul Linked Skills Berserk Pitcher (Lv 1) - Throws Berserker Potion on any class to increase their ASPD. Requires 2 Berserk Potions. Twilight Pharmacy I (Lv 1), Twilight Pharmacy II (Lv 1), Twilight Pharmacy III (Lv 1) -Enables mass Potion creation with different requirements (details will be down below). Twilight Pharmacy IV (Lv 1) - [Custom Quest Skill], Enables mass Potion creation. ========== Soul Linkers and you ========== Alchemist Spirit is a very useful buff for Creators and Alchemists. Sadly it needed to be nerfed a bit, therefor you most likely only can find it in use for Potter. The nerf affected the Increased effectiveness of Potion Pitcher, before that, Creators could easily Heal obscure amounts of Health (3 to 4 Pitches to heal a 1m HP Pally for instance). The Link provides the following effects: - Increase the effectiveness of Potion Pitcher by the Soul Linkers Base Level% (max 90). - Allows the Use of Berserk Pitcher, Twilight Alchemy I, Twilight Alchemy II and Twilight Alchemy III. - When using Mammonite, it will be on a 1,5x of it's cast Level (on Lv10 it will be Lv15). ========== A better potting story then Twilight ... and you ========== Twilight Alchemy I, Twilight Alchemy II and Twilight Alchemy III - as well as the custom Quest skill Twilight Alchemy IV are ways to mass create a decent amount of Potions in short time. NOTE: All of them require you to have 200 Medicine Bowls and the fitting Potion Manuel in your inventory. NOTE2: While writing this, TW is still buggy and might not work with your Creator, refer to the Bug Tracker to see details about this. Lets all hope it be fixed soon. qq Twilight Alchemy I (TW1) TW1 lets you created 200 White Potions in one go by using 200 White Herbs and 200 Empty Potion Bottles. This does not count into your Alchemist Ranking. Twilight Alchemy II (TW2) Creates 200 Condensed White Potions by using 200 White Potions, Witched Starsand and Empty Test Tubes. This will gives you points in the Alchemist Ranking. Requires an Super Novice in your Party. However, the SN don't need to be online to make this work. Twilight Alchemy III (TW3) Lets you create 100 Alcohol, 50 Acid Bottles and 50 Bottle Grenades in one go. Requires enough materials for all of them (100 Empty Test Tubes, 200 Empty Bottles, 50 Immortal Hearts, 50 Fabric, 50 Alcohol, 500 Stem and 500 Poison Spores). Requires and Taekwon Boy/Girl in your Party. However, the Taekwon don't need to be online to make this work. Twilight Alchemy IV (TW4) TW4 lets you create 200 Blue Potions in one go, by consuming 200 Blue Herb and 200 Empty Potion Bottles. Requires and Taekwon Boy/Girl in your Party. However, the Taekwon don't need to be online to make this work. (Works also without Link > Bug?) ========== Providing drugs for your local Junkies and you ========== A big, non fight oriented aspect of Creators is the potting. Creators can create a variety of Potions, a list of them with ingredients can be found here: http://ratemyserver.net/index.php?page=creation_db&op=4 Commonly Potter create Potions like Blue Potion and Condensed White Potion, but also Glistening Coats. If you create an item in that way, it will be unique with your Creators name. Success rate for the creation is mainly determined by the Job Level, associated Skills with it, INT, DEX and LUK, a calculator for the rate can be found here: http://ratemyserver.net/brew_calc.php (Note: Stats you insert there are Base + Bonus) Ranking A special mechanic is the Creator Ranking. For every Condensed Potion you make (Red, Yellow or White), you will get points. The current Ranking on the Server can be checked by /alchemist. > 3 Condensed Potions after another: +1 Point > 5 Condensed Potions after another: +3 Points > 7 Condensed Potions after another: +10 Points > 10 Condensed Potions after another: +50 Points If you are using Twilight Alchemy II, which creates 200 Condensed White Potions at once, that be in total 1280 Points. If you fail creating a Potion, the count goes back to 0 (the count not your total points). But why ranking? Potions created by the Top 10 ranked Creators heal 50% more, this includes HP healing potions as well SP healing potions. All Creators in the Top 10 heal the same, there is no difference. Higher Rank just means it's less likely to lose it. It doesn't effect Healing of Potion Pitcher or Slim Potion Pitcher tho. ========== Gotta catch them all! Homies and you ========== (In the picture above, the two different shapes "Vanilmirth" can have, including in his evolved 'adult' form.) Alchemists and Creators are the only class that can basically create their own unique "pet", a Homunculus. Homunculus is latin and means "little person". In RO, Homunculi support their master with fighting for them or give them supportive buffs. How to create a Homunculus? To create an Homun, you need to get the Platinum Skill (either on NPC or classic per Quest) "Bioethics". Then you can put on the follow up skills, "Call Homunculus" and "Rest" as well "Resurrect Homunculus". To "Call" a Homunculus you need to have a Embryo in your inventory. You can obtain these by either making them yourself or as loot in Bio Lab Basement. You will get a random selected Homun once you used the "Call" skill. If you like the result, you can keep it. If not you can "Delete" him, and call another random one (which will consume more Embryo). Your own stats can influence the Homun you get. Short Informations about Homunculus Since this is a Creator "Guide" I will not go in depth about Homunculus, for more details use the Wiki Page: https://wiki.ragnarevival.com/wiki/Homunculus_System In general tho, there are 4 kinds of Homun you can get for your Creator: Lif (Support), Vanilmirth (Magic Damage/Potting Support), Filir (Melee DPS) and Amistr (Tank DPS). Each of them have 2 different variants. It doesn't matter which variant you get, they are all the same within their kind (exp. blue bird Filir is the exact same as yellow bird Filir), it's purely aesthetic. Commonly people chose either Lif or Vanilmirth. Lif has a neat buff ("Urgent Escape") to increase Movement Speed which can come handy in PVP/WoE. Vanilmirth is used to help it's master on doing chip damage in PVP/WoE, sadly it is not very tanky, so you need to recall it a lot. Also it's Skill "Change Instruction" helps on creating Potions. ========== MvP/Instances and you ========== This will probably a short one. Sadly Creators aren't really used in MvP/Instance content, beside their support buff "Chemical Protection" on their Party members. In that regard tho, they are very important, preventing breaking from Equipment is always nice. (if you have a super duper MvP-ing build that does not involve Angra/Ahura, feel free to let me know :3) Their damage output isn't the best and is also very, veryyyy money consuming (if you go AD or Mammonite), you would have an easier and less money consuming time by just using another more DPS focused class. And sadly facing the more "stronger" MvP, Homunculus get killed quiet easily. (If someone wants to point out Magic Build now ... Might as well play High Wizard then, they got Magic too. :v) ========== Teaming up on the enemy and you ========== Creators have nice synergies with different classes, either on supporting them or combo off with then. Due to the nature of Acid Demonstration being always Neutral, people tend to tanking it with cards like "Ghostring Card" (Enchants Armor with Ghost). While you will do less damage, it will help your other team mates. Clowns Frost Joker can make them freeze, as well as Wizards Storm gust. In that frozen status Wizards can either start to Jupitle Thunder or Champions can Asura for good damage. Further Creators also like to team with Clowns for their Bragi, making Acid Demonstration even more spam-able. Other Notes Demonstration is neat not only to break your enemies stuff, but also to reveal Assassins and Stalkers. Bio Cannibalize can be used to remove traps, so if you are stuck and see more Traps ahead of you, remove them with your lovely cute plants! While Acid Demonstration depends on your targets VIT to deal more damage, it's generally a not so mart idea to only pick up on fat Paladins. Far more fun is picking classes that naturally use less shields; Sniper, Gunslinger and Assassin Cross. ========== Throwing Glass Bottles at your friends and you ========== Despite being not a 100% Healer class, Creators can reach pretty high values in terms of Healing. Their major focus lies in that case on "Potion Pitcher". "Slim Potion Pitcher" can be used too, but due to the reduced Value, the more people you heal, it is less used. Creators can easily reach 30.000k Heals like most High Priests can, however, Potion Pitcher Heal isn't as consistent as the normal "Heal". In one Pitch, you can Heal 25k, in the next 20k. In spam it doesn't matter much tho. Commonly used for Potion Pitcher Builds are: Bacsojin Cards, Meditatio Hats/RDC Helms for the INT bonus, Sterne/VVSHMace for the INT and Heal Bonus, Heal3 Orbs for the Heal Bonus and very importantly: Soul Links (best from a Linker and not Fable Silk). ========== Terrorism and you ========== You always had a secret fetish for explosion? You always wanted to just see the world burn? Then this handy little hat from the Touhou Lucky Box might be just be your dream item. Harvester Hat [2] - +2 AGI, +2 INT, Increases your Homunculus stats by 2*refine; REFINE +7: ATK increases by 1 for every 25 STR, multiplied by refine; REFINE +9: Grants "Nature's Blessing", FCP gets a small AoE around the Target. Nature's Blessing: All summoned Plants and Spheres will have 25% of your max HP and 10% of your ATK/Matk, as well as ASPD. Now that doesn't sound much like a burning world, so what is so special about that? It is the Hat at at least +9 in combinations with "Summon Marine Sphere". Marine Sphere explodes and deals damage depending on their left HP. Per default, Marine Sphere has on max Skill Lvl 4000 HP. With the Nature's Blessing they get 25% of your max HP. How to set it up? Per default, you will try to get your own HP as high as possible, which isn't that hard since "Tao Gunka Card" is very common in the server. Helpful can also be a Homunculus, because they "poke" the Marine Spheres, to move them, otherwise, you need to make them move. The Pros. - With this massive HP boost, they can deal a lot of damage. Unprepared or Classes with general lower HP pool can get killed easily. It is a handy tool to wipe out AFK or Alt members of guilds E-Calls. - You can reduce the damage you take from the Explosio with Fire Enchanted Armors, the Explosion is Fire Property. The Cons. - The probably biggest Con, and also one of the main reason Guilds not really like seeing their fellow Creators becoming Terrorist is, that these Bombs hurt everyone. And I mean, literally, everyone, even you. As easy as you can wipe out the enemy, you can wipe out your own allies. - It can be difficult to navigate the Bombs towards the enemy, especially if they push or retreat, making them often go into the nothing. - Despite having boosted HP, they can still be easily killed before they can detonate, if a DPS class picks up on them in time. Also, they can Freeze which also stops their detonation progress. - Fire Enchanted Armors do reduce the damage, but that also means you probably will take more damage from Water Property Magic like "Storm Gust". Also since you most likely will wear "Tao Gunka" to boost your HP, you can Freeze too. Even tho there quiet a few Cons, it can be a very handy and devastating skill nonetheless, especially in solo plays. But if you notice, you kill your own allies more then the enemy, you might should change the strategy. ========== Speed up! Midas and you ========== During sale periods the server released several 3rd Job hats. Also including the Creator one with the exclusive Skills "Cart Remodeling" and "Cart Boost (Geneticist)". For more informations check the wiki. The Movement Speed boost you get from the Genetic skill is pretty neat. It increases your speed by 60% for 90sec. Midas Whisper [4] - All Stats +20, ACD -10%, 10% chance to pierce Pneuma with Misc Skills; If worn by a Creator: enables Skills [Cart Remodeling] and [Cart Boost (Geneticist)]. ========== Stars, Eternal Love and you ========== Creators got a few nice weapons to give their skills more power or extra trolling powers. One that can boost the damage and is pretty often used is Sterne from Hall of Abyss. Sterne [3] - Increases damage when using Acid Demonstration or Cart Termination by 15%, Increases recovery rate of Potion Pitcher or Slim Potion Pitcher by 10%. Another special weapon for Creators is the Nicholas' Love from Wolfchevs Labratory. Nicholas' Love [3] - INT +3, ATK +5%, Increase Homunculus stats by 2 per refine; (Speciality Bonus) Acid Terror, if not breaking the enemies armor, has the chance of changing the enemies property randomly for 20sec. It is a handy little way on supporting your team by changing the enemies Armor Property randomly, combining especially well if you team mate is a Wizard that can spam all kinds of different elements. ========== Build Examples ========== Gonna update that late, it is late already. Wanna add an Terrorist build and if someone want to help out, I would take an AD focused example, ty, haha Potter: RDC Helmet: DEX, LUK and INT setting, with ACD - 4 Dark Illusion Cards (10% Cast time each) Fable Silk - Card doesn't matter (Pharao/Dark Illusion Card can be here, my Silk is used in WoE, that's why Gemini is in there for me) Any +Stat Lower (+15) - Pharao Card GOH - Any Armor/or no Armor goes; I use it for the 10% ACD Antiquated Shield - Ammo2 Orb - Only using this for the Ammo2 orb. Chance to nullify Catalyst usage by 2%. Poised Cloak - Ammo2 Orb - Only using this for the Ammo2 orb. Chance to nullify Catalyst usage by 2%. Ebony Greaves - Ammo2 Orb - Only using this for the Ammo2 orb. Chance to nullify Catalyst usage by 2%. Kiel Card, even tho I feel like it doesn't matter much. Poporing Ring - Chance to nullify Catalyst usage by 20%. 2 stack to 40%. 2 Beelzebub Card (30% Cast time each). Those stats and gears give 100% success rate (can be checked on RMS) and the maximum on ACD and Cast time for Twilight Alchemy. Further the maximum strength allows that you can carry as much pots as possible while potting. The Fable Silk gives a permanent link, so you don't need an SL alt. Potting: Buying Materials The main materials include: Medicine Bowl, White Potion, Witched Starsand and Empty Testtubes. For buying the best option is either using a Creator (with Lv 10 Discount: 24% less charge on NPCs) or a Stalker (Lv 5 Compulsion Discound: 25% less charge on NPCs). The character should have max STR, to ensure he can hold as much items as possible per deal. Enlarge Weightlimit with Gym Passes is optional. All mates can be bought on the Alchemist NPC in the Eden Mall, however, the NPC charges way more for some goods, then the regular selling NPCs. Medicine Bowls: Al de Baran (68 56, Alchemist Guild): 8z a piece (can only buy 2000 per deal) Witched Starsand: Eden Mall (99 35, Alchemist NPC): 484z; 363z (Stalker) a piece (as much as you can carry per deal) Empty Testtube: Geffen (65 176, Mage Guild): 3z; 2z (Stalker) a piece (as much as you can carry per deal) White Potion: Any Tool Dealer: 1200z; 900z (Stalker) a piece (as much as you can carry per deal) Potting: Set Up To create Condensed Slim Potions, you need a Super Novice in your party. This Super Novice doesn't need to be online, it is enough if he is just in the party for the whole ordeal. Further you need to be Linked (either via Fable Silk or a SL alt, this alt doesn't need to be in a party). Note: this is my personal set up, you can change up things as you like. I use both, a Gypsy with Fortunes Kiss (reduces SP usage) and a Clown with A Poem of Bragi. The Gypsies Service reduces my SP usage that much, that I don't even waste SP on Twilight Alchemy anymore, thus don't need to heal and can keep the storage up for the whole time of making potions. The Clowns Bragi helps reducing the Cast and After Cast delay of Twilight Alchemy to make the spam faster (note: you cannot reduce it to a 100%, you will always have a small delay). I usually take 1600 of each mate, this is the maximum amount I can take before becoming overweight. Then I just spam the Twilight Skill until the storage is full. Other Tips It can happen that the Party "does not work". This usually happens when the server restarts. If it happens, just kick all party members and re-invite them, it will fix the party. Use multiple storage's for quicker potting, I personally use only Guild and Account storage, but if you can, you can even use the Character storage as well ========== Other Equipment and Cards - Options - ========== Gonna mention only the Items that specifically are made for Creator or their Skills, or help them a lot. Erde [2] - Max SP +50, Increase damage of Acid Terror and Acid Demonstration by 20%, Increase Potions recovery rate by 10%. Red Ether Bag [1] - INT +5, ATK +5%, Acid Terror damage +10%, Homunculus STR/INT +5, Increase Homunculus STR/INT by 2*every refine over +5. Red Square Bag [2] - Max HP +200, Increase damage of Acid Terror and Demonstration by 20%, When killing a monster, there is a chance they drop a Potion; Base STR > 90: Chance to Stun enemy by 5%. Sealed Red Square Bag [3] - Max HP +1000, Increase damage of Acid Terror and Demonstration by 20%, When killing a monster, there is a chance they drop a Slim Potion; Base STR > 150: Chance to Stun enemy by 10%. Engelsflügel [2] - STR +3, HIT +50, ATK +5%, ATK +1%*refine, Chance of casting Wide Burning on attacking. Resplendent Ring [1] - Matk +125, Decrease SP usage by 25%, Decrease ACD by 5%. Pyuriel Card - Increase damage with Acid Demonstartion by 8%. Centipede Larva Card - INT +3, Matk +3%. Kiel-D-01 Card - Decrease ACD by 30%. Potter Oriented In general, everything is good that gives you either DEX, INT or LUK. For a faster Spam (TW oriented) try get as much cast reduction and ACD as possible). Poporing Ring [1] - Chance of Nullify consumption of Ammunition/Catalysts by 20% (in our case: Medicine Bowls). [Also works well for Killers, since it reduces the Acid Bottles and Grenades used for skills.] - 2 Rings stack Fortune Sword [0] - PD +20, LUK +5. Orleans Server [1] - 5% chance of Reflect Magical Attacks, Mdef +2. Orleans Glove [1] - DEX +2, Matk +3%. Orleans Combo: Reduces Variable Cast Time by 10%. Berzebub Card - Reduces Variable Cast Time by 30%. Tower Keeper Card - INT +1, Reduces Variable Cast Time by 5%. Pharao Card - SP consumption -30%. Dark Illusion Card - Max HP/SP -10%, Reduces Variable Cast Time by 10%. Ammo2 - (Cedi Orb) Nullify Ammunition/Catalyst cost by 2% chance (in our case: Medicine Bowls). ========== Conclusion ========== Creator can fill in a lot niches with their skills. From providing supplies for their friends to fight and defend them, you can choose several routes. But there is also a bit downside on it: Creator is a class that literally throws their money at the enemy. Not only literally with Mammonite, but rhetorical with Acid Demonstration, Acid Terror, Demonstration, Sphere Mines and so on, all the Bottles cost money (if you are not insane enough to farm that all). Make sure you got enough resources to maintain the play style, or you will soon need to play something else. haha But Hey! At least you get an adorable pet Homunculus to look at. ~
-
Need say, more open scripts do would help a lot. I would even go as far as a open Skill List for MvPs/Mobs. Like atm me and Connor hunt a Mvp and have no idea how we suddenly take insane damage out of nowhere. lol
-
It's not only focused on the event, in general. Some topics just fit better in wiki then forums. (and I mean ... where is the point in having both when informations get posted back n forth in both?) The major problem we got with wiki atm that it's a clusterfuck of informations, everything's everywhere and since forums not really has categories, it might happen here too if we get 20 guides on the same topic. I don't wanna say, don't write, but it might get messy. (maybe add after event a post above guide section were all guides are collected in a list?)
-
Well as you guys might notice, me and Connor already worked on updating the wiki (our biggest problem tho are the lack of rights lol). Anyways, I agree with that and that's what also is a bit my issue with the forum updates recently. Not to offend but most stuff is just glorified wiki posts (adding pictures). What to change, what works best is what a guide makes special, telling what to do when unexpected things happen. Not just retell the same story.
-
Recently, since the GMs started the "write a guide" event, we got a whole bunch of activity in the forum's. Which is great, its sad to see no one seemingly cared for it...lol But it also raised a question formme after seeing all kinds of guides... What is actually to you guys considered a "good" guide? And I mean everyone here, not only GM. Sometimes guides range from written essaies right off the stretch to basically a wiki copy with additional pictures. If just more pictures "help", should we maybe aim next on update wiki with that maybe? What are your thoughts guys ~ kthxbai.
-
Frankly, I am not even sure what those "Level" descriptions mean in Wiki about Reputation. If in any doubt, I would always recommend do them all till the every end. Just to be sure. I personally don't have the skill on my Priest, but I saw it on my friends Priest, so it do seem to work. Just try again after finishing all of the Reputation Quests, I guess.
- 1 reply
-
- 1
-

-
- high priest
- reputation quest
- (and 1 more)
-
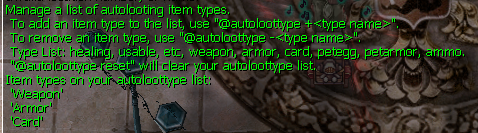
Don't know if you knew the command, but you could add to the loot list @aloottype +[category], for example @aloottype +armor. Note: seem to only work if you write them small letters (armor not Armor). EDIT: tested a bit around with that, loot % seem to still count with in that, if you lets say go loot 1, you will not get loot that always drops even if you aloottype it.
- 7 replies
-
- 1
-

-
- lokicommands
- efficiency
- (and 2 more)
-
*Vietnam Flashbacks of my son Jimbo taking way more naps then he needed* Anyyywayss, nice guide! Really should go do some Glory Golden Hole again. wew
-
Also to add up on the list: - Back attack!! (morroc pyramid) - Hamatan (morroc sphinx) - Monstary in Disguise (Cursed Abby) - Clock Tower/ Dali Theme - Moscovia - Christmas in the 13th Month (Nilfheim, how could I forget that) AND HOW DID I FORGOT MY ABSOLUTE FAV OF THEM ALL: - Jitterbug (Nightmare Jitterbug Instance) Gonna add more if I remember more, also gonna link you later a yt channel that has nice remixes, since you like ro music on a side note, the topic had better fit on Off Topic in my opinion but welp.
-
Still offended that the pressure didn't even got mentioned.
-
Hope you are ready for the conspiracies surrounding you ~ Anyways herro Leo.
-
As long as you be a good Buff slave all should be fine. 😛
-
+20 alone for those perfectly balanced states. lol On a more serious note, nice guide. :3 Teach me how to tank Seth next please qq
- 1 reply
-
- 1
-

-
- escape the room
- rdc tier 4
- (and 1 more)
-

gcq's (way too much) Frequently Asked Questions and you
gcq replied to gcq's topic in Ragnarok's Guides
Haha no problem, tho need update it more frequently. lol Also I thought of may be someone can translate it, to maybe tagalog or any other Asian language? Since I feel like that's the biggest issue here, the language barrier. -
First of all: we ALL can win the Tier 3 prizes. Second of all: of course I started making guides to win, THAT'S THE WHOLE POINT OF THE EVENT. To encourage people to make guides. Third of all: you are such a bigger person that you needed a whole other thread to prove that you are in the right. hue Anyways, kthxbai.
-
Amazing Guide. Maybe reduce your gif-Fetish and write a bit more.
-
gcq's (way too much) Frequently Asked Questions and you
gcq replied to gcq's topic in Ragnarok's Guides
Updated FAQ a bit with some guides our pro Aka made. -
refining Aka Gelato's Guide to Black Smith Blessing and New Refining System
gcq replied to a topic in Ragnarok's Guides
We had that already tho 😛 -
Did another class guide, now I am done for sure. Kthxbai nubs.
-
========== "May Odin be with you" High Priests ... and you ========== IGN: g c q, yandereQueen, Ghost Lead and many more; Special thanks to Connor ~ ========== Overview ========== High Priest is the main branch a Acolyte can choose if they are not going to be a Champion. Probably the most iconic supportive class, High Priests can reach the highest Heal values and cure the most abnormal status players can have. This guide will focus more on the play style and sort of Trivia knowledge, and just mention the more important gears to use. For a full list on common tank gears (that are not class specific), check out my Performer guide /wink ;p. ========== The Skills ========== -- Values on the skills always be on max level of that skill, if not stated otherwise. -- First Class, Acolyte Ruwach (Lv 1) - Can reveal hidden enemies and deals a small amount of Holy damage when do so. (Can't reveal Chase Walk Stalkers) Teleport (Lv 2) - On Level 1, teleport you randomly. On level 2, to the save point. You can select the level. Warp Portal (Lv 4) - Creates a Warp Portal on the ground, that teleport up to 8 people. On max level you can save up to 3 locations. [Use /memo on a map to set a location] Requires 1 Blue Gemstone. Pneuma (Lv 1) - Creates a shield that for a short time protects the surrounding area from long-range attacks. Can't be cast on a cell that has Safety Wall on it. Heal (Lv 10) - Restores targets HP. INT affects the amount, also Equipment that gives Heal Bonus. Can hurt Undead Property Enemies. Cure (Lv 1) - Heals abnormal status such as Silence, Confusion or Blind. [With Asteria Ring: Heals Deadly Poison] Aqua Benedicta (Lv 1) - Creates Holy Water. Requires a Empty Bottle and you need to stand in Water or Deluge/Water Escape Technique. Increase Agility (Lv 10) - Increases the Targets Movement Speed and ASPD. Drains 15HP from the caster. Cancels out Decrease Agility. Decrease Agility (Lv 10) - Decreases Enemies Movement Speed and ASPD. Success rate affected by INT and Targets Mdef. Cancels out Increase Agility. Blessing (Lv 10) - Increases Targets STR, DEX and INT. Cures Curse. Divine Protection (Lv 10) - Increases DEF by +30 against Demon and Undead monsters. Demon Bane (Lv 10) - Increase ATK by +30 against Demon and Undead monsters. Signum Crucis (Lv 10) -Decreases the DEF of Undead and Ghost monsters on the screen. DEF reduction is 50%, Success rate depends on casters BaseLv and Targets Lv. Angelus (Lv 10) - Increases DEF and VIT of the whole Party. Holy Light (Lv 1) - [Platinum Skill] Holy Property magic attack, Single Target. Transcendent Class, High Priest Kyrie Elesion (Lv 10) - Creates a Barrier for the Target, that blocks physical attacks. Lasts 2min if no attack comes in. Blocks 30% Max HP or 10 Hits. Gets over written by Assumptio. Gloria (Lv 5) - Increases LUK +30 for the whole Party. Magnificat (Lv 5) - Doubles HP/SP recovery for the whole Party. Benedictio Sanctissimi Sacramenti (B.S.Sacramenti) (Lv 1) - Enchants Armor with Holy Property for all Party member on screen. Requires an Acolyte-Type class next to the caster on both sides. (Acolyte - you - Acolyte) Slow Poison (Lv 4) - Slows down the effect of Poison. Stops Poison effect and allows HP/SP recover. (doesn't cure it) Status Recovery (Lv 1) - Cures abnormal status on Target: Frozen and Stone Curse. Assumptio (Lv 5) - Incoming damage will be half on PVM maps, be reduced by 1/3 on PVP maps. Not usable in WoE. Gets over written by Kyie Elesion and Kaite. Does not reduce fixed damage as exp. Tarot. Impositio Manus (lv 5) - Increases ATK of the Target by +100, for 1 minute. Suffragium (Lv 3) - Reduces Cast time of one skill by 45% for 10 seconds. Can't be casted on yourself. Aspersio (Lv 5) - Enchants the Targets Weapon with Holy. Requires 1 Holy Water. Mace Mastery (Lv 10) - Increase damage with Mace Weapons by ATK +30. Mana Recharge (Lv 5) - Reduces SP consumption of skills by -20%. Increase SP Recovery (Lv 10) - Increases natural SP recovery by +30 SP every 10 seconds. Increases heal of SP items by 20% per skill Lv. Meditatio (Lv 10 /varies) - Increases SP Recovery and Max SP, as well the amount Healed. Adds additional level on Blessing, Increase Agility and Decrease Agility (Lv 10 Blessing and Lv 5 Meditatio become Lv 15 Blessing). Healing boost is 11% per level. Resurrection (Lv 4) - Revive the Target with 80% of their max HP. Requires 1 Blue Gemstone. Damages Undead Property Enemies a lot. Turn Undead (Lv 10) - Damages Undead Property Enemies, with the chance (max 70%) of instantly killing it. LUK and INT increase the chance. Lex Divina (Lv 10) - Silence an Enemy. Cancels Silence on a already silenced Target. Lex Aeterna (Lv 1) - Target receive double damage from the next hitting attack. Won't affect Frozen or Stone Cursed enemies. Basilica (Lv 5) - Creates a Sanctuary (5x5 around caster) that prevents monsters from attacking everyone inside. Aggro monster will start idle, and you can't cast attacks inside or attack anyone. Ineffective for Boss monster. Can't be used in WoE. Casting it again will cancel it. Caster can't move or use other skills while it's active. Requires 1 Blue Gemstone, 1 Red Gemstone, 1 Yellow Gemstone and 1 Holy Water. Magnus Exorcismus (Lv 10) - Deals Holy damage to Demon monster and Undead Property Enemies on a Cross like AoE on the ground (7x7 around the set cast). Hits enemies in waves every 3 seconds (10 waves on Lv 10). Requires 1 Blue Gemstone. Sanctuary (Lv 10) - Creates a healing area on the ground (5x5), and heals everyone over time. Inflicts Holy damage Demon monsters and Undead Property Enemies. Can heal up to 13 targets at once. Can heal the Emperium in WoE. Requires 1 Blue Gemstone. Safety Wall (Lv 10) - Creates a 1 cell barrier on the ground that protects from short range attacks. Protects from 11 hits. Can't be cast on Pneuma. Requires 1 Blue Gemstone. Redemptio (Lv 1) - [Platinum Skill] Self Sacrifice to resurrect every dead party member on the casters screen with 50% of their Max HP. Empathy (Lv 1) - Quest Skill, Enables to see the HP bar of friendly entities (such as Allies in WoE) outside of your own Party on the screen. Commonly good skills to get in WoE: Pneuma, Heal, Increase Agility, Blessing, Decrease Agility, Ruwach, Cure, Holy Light (good to cancel Enemies E-calls, if they not Holy Armor you) Status Recovery, Safety Wall, Sanctuary, Lex Aeterna, Meditatio, Increase SP Recovery, Aspersio, Imposito Manus, Assumptio (even tho it can't be used inside the castles, you can buff it outside), Kyrie Elesion, Gloria, Magnificat Commonly good skills in PvM content: Pneuma, Heal, Increase Agility, Blessing, Cure, Angelus Status Recovery, Safety Wall, Sanctuary, Lex Aeterna, Meditatio, Increase SP Recovery, Aspersio (Optional, if your Killer needs it), Imposito Manus, Assumptio, Kyrie Elesion (less frequent, Assumptio is mostly the better option), Gloria, Magnificat, Resurrection, Redemptio (Really depends on how fast you can cast it, in most cases Resurrect one by one is just faster, and damages you less) Magnus Exorcismus (if you wanna dish out some damage on Undead enemies, good for clearing weaker slaves) Why not Mana Recharge? Mana Recharge itself sounds nice with its 20% reduction on skill, but the big downside to it is the requirements to get the skill. You need to have Demon Bane and Mace Mastery at lv10 in order to skill it. Loki has Job Level 120, but in my opinion it's not really worth it and you might be better off skilling other things like Magnus Exorcismus or Turn Undead. Beside that, you naturally get a pretty neat SP recovery (Especially if you skilled Increase SP Recovery). ========== Healing and you ========== Heal it probably by far one of your most important skills to keep everyone alive if they took damage. So getting it on high values is mandatory. Per se, there isn't a real cap on how high your value can go. However you get limitations by gears you can use and stats to obtain. The general formula for Heal is [((BaseLv + INT)/8) * (4+8*SkillLv)]. A lot of other factors can affect the Heal. For example, my Priest without any gears and Meditatio does 5.460. Heal Cap When skilled Meditatio, the heal does up to 11.466. Lets add some equipment, shall we? Equipping and VVVSHardened Mace (I will give details to the items down below), the Heal becomes 15.134. Adding Rima's Ribbon with 2 White Lady Cards (together Heal Potency bonus be 70%) on top of that makes it 23.636. You get the drill of it. You can stack Heal Potency bonus' but there is a cap to it, 100%. Which means, for example White Lady Card (each give 30%), will stack with 4 pieces to 120%. 20% be wasted to nothing, so people usually go with 3 of them. Some Heal Potency Bonus don't stack however. For example 3 White Lady (90%) + LWW (10%) give together 27.352. However, if we combo 3 White Lady (90%) with a VVVSHardened Mace (10%, also gives INT) we will get 28.168. Only a few items can get pass over the Heal cap, for example Diabolus Robe (6%), together with VVVSHmace and White Lady (all over be 106%), they reach 28.576. But reaching the Heal Cap doesn't mean you still can't go higher, INT bonus (INT+Value) also affect the Heal number. Also, Item and Gear effects of your Target can increase your Heal on them. Regeneration Potion increases received Heal by 20%. Healed3 Orb from Cedi by 3%, Healer's Heart Hat by 15% and so on. Tl;dr: There are different scripts that go into the Heal cap, which means some a few Items can go over it. In general INT helps to increase Heal past the cap. Heal "Bombing" Heal Bombing is the term for using Heal as attack on Undead Property Enemies. It will not heal them, but damage them. It is a handy technique to quick level up Acolytes or Priests, since Heal has a low ACD. In WoE it can also be useful because it can hurt Evil Druid Users. How to do it: Hold "shift" and aim for a Target with Heal. Alternatively you can type "/ns" and active the [no shift] option. Heal Walking and Animation Breaking Every skill has an animation that plays when you use it. Even if your skill has no Cast Delay (or at least not that big that you would feel much of it), you still will be delayed by your animation. You can break this delay tho and spam a skill faster. "Heal walking" is one way to do it, you break the animation of Heal by moving. It does need a lot of practice tho. Note: I am not very good myself at "Heal Walk", so the example here isn't perfect at all. Also laggy. Another, more easier way to archive the "break" is by getting hit from an enemy. You will be in the being attacked position, and have less delay on the spam (a similar thing do Creators if they want farm Herbs from Plant Cultivation). The only downside to this is, that you will receive damage, meaning you do need to be tanky to keep up with your party. Note: Since the EU proxy went down the drain I am laggy, I apologize for that. ========== Curing Abnormal Status and you ========== High Priests got several skills to cure many status effects, in PVP and PVM. Many status effects you can visually see, like Frozen Targets being in Ice (and not moving) or Cursed Targets having a Grim Reaper and walking slow. As side note; on a limited time sale we got the "Lovey Set" which allows you to use the Skills Lauda Ramus and Lauda Agnus, which can cure status too. For more detail on that check out the Equipment options down below. Frozen; Stun - Status Recovery Curse - Blessing Stone Curse - Blessing, Status Recovery Silence - Cure, Lex Divina Blind; Confusion - Cure Poisoning - Slow Poison (doesn't cure it, but slows it's effect) Critical Wounds; Deadly Poisoning - Cure (with Asteria Ring) However, Critical Wounds is a bit harder to notice, but also very important to heal. The easiest way to notice if, for example your Paladin friend got the status, is by communication or if you notice that your Heal does way less then before on him. What does Critical Wounds do? It reduces the effectiveness of Heal, Sanctuary and Aid Potion on the Target by 20%*Lv of the Critical Wounds inflicted (A Card that inflicts the status would be for example Drake). It can be dodged by Safety Wall (if you get melee) or Pneuma (if range), or by having 100+ PD. ========== The Party and you ========== A good party set up is important to make everyone's support Job easier. Not only do you see nicely when someone is about to kiss the floor when their HP goes red, you also can easily buff everyone with Magnificat, Gloria or the third job buffs, Clementia, Cantocandidus, Lauda Ramus and Lauda Agnus. Since the party changed with the client, you can now drag and drop party members onto your screen. Simply right click on the name you want to drag, hold and put it out of the Party window on your screen. You can put them anywhere, where it is the most comfortable to you. This only works when the Lock is open (red on the screenshot). Keeping the Lock closed is important too tho. When you are done arranging your party members (or you like the window style more keep that), you need to lock it, otherwise it can happen that you accidentally drag them around while being in action. Another thing, why you need to keep the Lock closed is, that if you spam, for example Heal, you will keep getting the "Chat 1:1" option (a small chat box will appear). This will not happen when the Lock is closed. Angelus Angelus is one of the three party wide buffs you get. It is mostly, if even, only used in PVM. In WoE/BG/PVP it isn't used here because it can increase the SDEF by a lot, which will make you a Thana-Bait. What is a Thana-Bait and why it is bad? Thana-Bait means that you will take more damage from people that use Memory of Thanatos Card. Usually people with a lot VIT gain this as side effect, because also their Soft Defense (SDEF) increases. You can see if you are Thana-Bait by the numbers at your [Def], example 40+119, with 119 being the SDEF in this case. Usually a value till around ~110 is considered ok, more SDEF can start to hurt. Back line Support If your guild is defending and you don't have much people on the portal that need to be baby sit, you can stay in the back. That way you can keep up important buffs, keep Pneuma up and get receive no damage (which will take one less damage source from the devotion Paladin, making his job easier). Same idea can also apply in PvM, like Cedi and RDC. In most cases, your Tank (should) be ok on his own. To avoid being hit by AoE Curses (such as Dark Lord in Cedi), you can stay in the back. ========== Soul Linkers and you ========== Even tho your benefit from a Soul Link isn't as crucial as, lets say a Performer has, it can still be pretty handy. What does the Soul Link do? The "Priest Spirit" increases the damage of "Holy Light" by +400%, and also increases the SP cost for the skill by +400%. This can make Holy Light to deadly weapon. With decent Equipment you can kill people with it quit easily (or Monsters). However, there a few downsides to that. It is more of an "Surprise" tactic. Mostly all Priests do play support, so most people don't expect you to attack, if your are not already infamous for that. And that's where the biggest downside comes in play. Once the enemy knows you might gonna attack them, they can either start wearing "Maya Card" to reflect your attack or simply just start wear an Holy Armor, making you miss them. In conclusion, it's a handy side option to pick off people off guard (people with no shield like Sniper/Gunslinger, or a Breaker in breaking attempt), but personally I wouldn't recommend it as soley way to go. Kaite Kaite is one of the main Buffs a Soul Linker can give. It reflects magical damage, but also Heal. You can't heal a Target that got buffed with Kaite. ========== Breakers and you ========== High Priests play a very important role on defending castles in WoE, especially the Emperium. The Emperium is a Small, Angel "Monster" with Holy Property. Your main job will be the keep the HP of the Emperium high or full, which you can archive by casting Sanctuary under it. If a Breaker attacks it, usually either a Assassin Cross, Sniper or Stalker, you commonly can stop him by Aspersio him. His attack will become Holy, therefor missing the Emperium. -- Side note: on the old rro, Breakers commonly used the Berzerk effect of "Lord Knight Card" to boost their damage. However while in Berzerk, they can't use Skills or Itemsm which made them the perfect target of being Aspersio'ed. They couldn't change their Weapon Property, if they didn't got dispelled. Nowdays, LKC is a pretty rare card, so you will most likely not face that. -- However, Breakers (sometimes) are also smart. If they are using an "Evil Druide Card", their Property becomes Undead. You can't Aspersio them. The only solution to that is depending on who attacks and how the conditions are. If a Assassin or Stalker melee attacks, you can only spam Safety Wall on the Emperium to protect it. If a Sniper or Stalker attacks it with a Bow, use Pneuma. Both will not work tho if there is a Landprotector under the Emperium. You can protect the Emperium with a Square of 4 Safety Walls. One Pneuma on it directly should be enough to protect it from range attacks. If the Breaker starts to attack you while his Weapon is Holy Property you can also change your Armor to Holy. He will miss on you as well then. Alternatively you can get a PD set when defending the Emperium. For breaking they use simple Melee Crit lock, they will miss on you if they not use skills. Killing a breaker can be difficult as a pure support, since you will be either busy Spam Safety Wall/Pneuma on Emperium or Aspersio to prevent as much damage as possible. Tho, if they are Undead Property, Turn Undead or simple Resurrection will hurt them a lot. Picture down below shows the usage of a PD set to avoid damage from a Assassin Cross (who apparently has not much brain /jk). ========== Mora Items and you ========== Mora Dailies is a neat little time killer, the coins used for the several NPCs in Mora can be obtained by doing some small tasks for them or doing the Mistwood instance. A detailed view of all the items in Mora can be found here. The most interesting one of the Priest items is probably the "Light of Cure", because it can be enchanted with Cure Lv1 - Highness Heal. Beside that the Mora NPCs also provide the "Affection" Set to improve Priests heal powers. NOTE: The Highness Heal will not be available as a stand-alone Skill. It will be an auto cast effect on yourself. Light of Cure [1] - VIT +2, INT +2, DEX +2, Increase Heal Potency +5%. (Possible Enchants include: INT +1/+2, Mdef +6, DEX +1/+2, VIT +1/+2, HP +500, ATK +2% and Cure Lv1) Highness Heal (Lv5) - Doubles the healing amount of your Heal on Lv1. ========== Common Gears to use as High Priest ========== I will here only list items that are directly usable as Priest, not general good tanking items or things everyone can use. Headgear Options Cash shop items, some might be sale only. Heaven's Glow [4] - DEX +15, INT +20, Adds +3Lv on Meditatio. Heavenly Ribbon [4] - All Stats +25, Movement speed +25%. Heavenly Combo: Enables the use of Cantocandidus Lv2 and Clementia Lv2 as Priest. Cantocandidus (Lv3) - Casts "Increase Agility "on the whole party, in a 7x7 AoE on Lv2. Clementia (Lv3) - Casts "Blessing" on the whole party, in a 7x7 AoE on Lv2. ======= Lovely Heart Cap [4] - DEX +20, INT +20, PD +5, Adds +3Lv on Meditatio, Decreases ACD by 5%. Lovely Angelic Wings [4] - All Stats +25, Movement speed +20%, Heal Potency +7%, Adds 1% chance on freezing enemy if being hit. Lovely Hearts [1] - All Stats +18, All Status Resist +10%, Increase Long-Range Resist +5%. Lovely Combo: Enables use of Lauda Agnus Lv2 and Lauda Ramus Lv2 as Priest, Demi Resist +5%. Lauda Agnus (Lv4) - Recovers whole Party from Freezing, Stone Curse, Blind, Burning, Cold and Deadly Poison with a success rate of 60%. Lauda Ramus (Lv4) - Recovers whole Party from Silence, Sleep, Deep Sleep, Stun and Poison and Chaos with a success rate of 60%. ======= Mitra [4] - All Stats +25, Holy damage +25%, Chance of casting Pneuma when being hit; If being Priest: Enables usage of Judex. Judex (Lv5) - Deals Holy Property damage on the Target and surrounding Enemies in a 3x3 AoE. ======= Feather Ribbon [4]; Priest Doll [4]; Noah's Hat [4]; Chinese Knot [4]; Melting Heart Icecream [4] - DEX +15, INT +20, Adds +3Lv on Meditatio. (Dyna Upper can also be set with those effect) Scarlet Anglel Ears [1] - DEX +10, STR +10, AGI +10, VIT +15, Fire Resist +10%, Nullify Gemstone and Ninja Stone requirements for skills. Non-Donor Items Priestly Nurse's Cap [2] - INT +15, Gives Assumptio AoE around the Target. Poring Book [1] - ASPD becomes 196, Weapon Attack becomes Holy, Increase Holy Property damage, Shadow Resist +10%, (As Priest) Gives your Heal an 7x7 AoE. Poring Priest Combo: Increase Heal Potency by 50%. ======= Rima's Ribbon [2] - Increase Matk +5%, INT +5, Heal Potency +10%. Shrine Maiden Hat [2] - Damage with Mace Weapons +10%, Damage with Books +2,5%*refine rate; Refine +7: Chance of auto casting Heal on yourself with the Level you know it; Refine +9: Grants Heal AoE, Increase ATK by 4 for every 10 INT. Event Rose Eyepatch (White) [1] - Increase received healing by +15%, Increase Heal Potency +20%, Demi Resist +1%*2 refine, Chaos Immunity. Yggdrasil Crown [1] - Mdef +3, Increase received healing by +10%, Increase Heal Potency +5%; Refine +7: +5% Heal Potency; Refine +9: +5% Heal Potency. Rabbit Bonnet [1] - ACD of Heal -10%, Increase Heal Potency +20%. Rosen Headband [0] - Increase Heal Potency +10%, Usage of Cure Lv1, Reduce damage taken by 7%. Holy Ward [1] - Increase Heal Potency +10%. Large White Angelwing [1] - PD +10, Increase Heal Potency +10%, Decrease damage taken by 10%. Large Blue Angelwing [1] - Matk +10%, Ignores Enemies Mdef 10%, Nullify Gemstone requirements for skills. Armor Options Diabolus Robe [1] - Max SP +150, Mdef +5, Reduces Cast Delay by 10%, Increase Heal Potency +6%. (Can be enchanted with Hidden Enchants) Diablous Ring [1] - Max HP +100, Max SP +100, Increase Heal Potency by 5%. Diablous Combo: Matk +3%, ATK +3%. Weapon Options NOTE: Acolytes can't equip any Dagger type weapon. They got access to Staffs/Rods, Books, Maces and Knuckle Type Weapons. Very Very Very Strong Hardened Steel Mace [0] - ATK +75%, INT +10, Increase Heal Potency +30%, Unbreakable. Long Mace [0] - Increase Weapon Range +3, Long Range Resist +10%. Rod [4] - Matk +5%. (Commonly used for the 4 slots.) Solid Rod [0] - Matk +15%, PD +10+(refine rate). Spike [0] / [2] - CRIT +40%; If VIT <=150: Decrease SDEF by 2/3, Otherwise by flat 100. Ledger of Death [2] - Matk +15%, STR +3, INT +3, LUK -20, Chance to cause Coma on Demi-Human enemies, ASPD Bonus depends on Weapons refine level. Darkwood Rod [3] - INT +3, Matk +15%, Gives Soul Strike and Holy Light a 3x3 AoE and 2 cell push back, you cannot be linked while using this item. Aaron's Rod [3] - INT +3, Heal Potency +5%, Matk +15%, ACD -0,5%*refine. (Specialty Bonus: Grants Kyrie Elesion of 10% Card Defense that lasts 15sec. (Card Defense reduces the effectiveness of card-based damage modifiers.) Vomars' Virga [3] - INT +5, Matk +10%, Increase Heal Potency +15%; If Gloria Lv5: +1Lv on Gloria; If you are Married: Heal Potency of Sanctuary +10%, Matk +5%. Thanatos Staff [2] - Matk +15%, INT +10, VIT +10, LUK -10, Ignores enemies Mdef by 1%*refine, Increase Heal Potency +10%, Magical attacks have chance to restore HP/SP, Drains 1000 HP every 10sec, Drains 1000 HP when unequipped. ======= Battleground Weapons, Glorious Arc Wand [0], Strong Recovery Wand [1], Glorious Cure Wand [0] and, mainly Speedy Recovery Wand [0]. Together with the Battleground Enchants: Priestly 1, 2 and 3 (which increase Heal/Sanctuary Potency by 6%/2%, 12%/4%, 18%/6% respectively). ======= Holy Stick [1] - Matk +15%, Reduces Casting time for Holy Light, Turn Undead and Magnus Exorcismus -25%. Exorcism Bible [0] - HP/SP Recovery +3%, INT +1. Exorcism Combo: Magnus Exorcismus damage +20%, Chance of auto casting Lv1 Turn Undead when receiving damage. Shield Options Bible of Promise (2nd Vol.) [1] - Mdef +5, Increase Heal and Sanctuary Potency +5%, Chance of receiving "Odin's Power Lv2" (ATK/Matk +10%, DEF/Mdef -20) when attacking. Accessory Options Asteria Ring [0] - Enables Cure to heal Deadly Poison and Critical Wounds. If Heal is known at Lv10, grants it an AoE of 3x3. If the Refines +3 or higher, the AoE becomes 5x5. Spiritual Ring [0] - INT +2, DEX +1. Clip [1] - SP +10. OR Rosary [0] / [1] - LUK +1, Mdef +3. Spiritual Combo: Magnus Exorcismus damage +30%, Heal damage on Undead Property enemies +50%, SP Recovery +9%. WoE Set WoE Robe [1] - Mdef +5, PD +10, Wind Resist +10%, Matk/ATK +5%; Refine +5: Increase recived healing by +15%; Refine +8: Max HP +20%, Matk/ATK + 5%. WoE Muffler [1] - Mdef +7, All Element Resist +1%*refine, Max HP/SP +1%*refine, Demi Resist 1%*2refines, Ignore elemental Resist by 1%*2refines. WoE Shoes [1] - Mdef +7, DEX +10, Max HP +1,5%*refine, Increase Movement Speed +10%, Reduce Melee damage by 1%*2refines. WoE Set Combo: Increase recived healing by 5%, Demi Resist +20%, Increase physical and magical damage on Demi +10%. Card Options White Lady Card (Bacsojin Card) - Increase Heal, Sanctuary and Aid Potion Potency by +30%, Increase SP consumption +15%. Rhyncho Card - Heal Potency +3%, Increase SP consumption +5%. Lif Card - Increase Heal Potency +4%. Mogwai Card - Gives Lex Aeterna an AoE of 3x3 around the Target. Cookie Card - LUK +2, Holy Light damage +10%. Poring Priest Card - Enchants your Armor with Holy. Chance of changing attacking enemy Attack to Holy Property for 3sec. Angeling Card - Enchants your Armor with Holy. Mistress Card - Nullify Gemstone requirements for skills, Increase SP consumption +25%. Aenbharr Card - Increase Holy damage +10%, Decrease Heal and Aid Potion Potency by -7%. Stalwart Sentinel Card - Increase Holy damage +3%, Grants Holy Cross Lv3. Saint Trofimena Card - ACD -7%, Grants "Sanctuary Power" at a rate of (INT/5)%. Increase Sanctuary Heal Potency by "Sanctuary Power" rate%. Sanctuary Power: All Players will be buffed with "Increase Agility" and "Blessing" (at the Lv you know) if they step into your Sanctuary. Kiel-D-01 - Reduces ACD -30%. Other Heal3 Orb - Increase Heal Potency +3% (Enchant for cedi items, expect GO-set and Wings) ========== Gear Set Examples and you ========== Note: Currently I am not maining my High Priest, beside doing some supportive stuff in instances. So the more WoE Oriented suggestions aren't optimal carded. Left Image: Example for a tanky Demi-Resist set up, Cure of Light can we switched for Asteria for the AoE Heal. Right Image: PD Focused set for facing Crit lock (mostly SinX). LWW with Gemini-S58 Card. NOTE: Gloria is active, Schwartzwald Pine Jubilee is active. Example for PVM, supporting in instances such as RDC or Cedi. Tho, frankly, if your team is good and knows what it does, you not really need "special" items for such stuff. Just be prepared in case the world goes down and you need to do more then Buff and the Heal here and there. LWW here with Mistress Card. NOTE: on stats for PvM, non-donor item areas, if you are switching from donor items, make sure you got enough DEX for the instant cast. 😜 Example for high Heal focused. NOTE: Blessing is active. Also, Bible of Promise, Light of Cure and Diablous Ring don't matter much in adding up the heal number. The only thing that would increase it now be Regeneration Potion and INT increasing items/gears. ========== Conclusion ========== High Priest is a highly demanded support class for all their buffs and Heal abilities, tho for most people it can be a boring experience, since you mostly just sit there and watch other people do the killing. So kinda need to be the "support" player to keep on enjoying playing it. Furthermore, people tend to keep pushing the blame on you if they die. But don't worry too much about it, if you know you did a decent job (and not stand there like a afk-bot or put wrong Buffs everywhere). And also, it can be a satisfying feeling when your team wins or holds the castles because of a decent support. :3
- 2 replies
-
- 4
-
-
-
- high priest
- priest
- (and 4 more)