Leaderboard


Popular Content
Showing content with the highest reputation on 10/18/2019 in all areas
-
I made this guide as i noticed no one was doing port malay instances so to encourage them i wrote this,Port Malay instances mainly focuses on philipines folktale. I believe in my Opinion It's an all rounder class in with various uses in PvP,and MvP,Sinx has one of the highest damage output compared to many other classes thats why its preferred by most of the people,It is also Quick and Cloak enables them to not be seen by their enemies,My main purpose using Sinx is this guide is for farming and Mvp killing. 1)Talk to Rodel the Guard @jump 266 76. 2)Talk to Phong in Mumbaki @jump 185 358. Choose any of the options. 3)Talk to Old Man Nardo @jump 181 353. 4)Talk to Collection Dealer Woeon @jump 295 171. 5)Talk to Pedro the Sailor @jump 326 68. Choose Sure and whichever you want. 6)Talk to Blacksmith Pandoi @jump 119 217. 7)Talk to Talah @jump 223 267 and Romel next to her. Return to Phong in Mumbaki @jump 185 358. Choose Explain what happened and Holy Water. Deliver the items to the 6 people you talked with. Return to Phon in Mumbaki and gain Base EXP 4,950,000, Job EXP 5,000,000 ------------------------------------------------------------------------------------------------------------------------------------------------------------------------------------ Use the Warper > Towns > Malaya. Talk to Nurse Las @jump 55 72. Choose Yes, About the hospital, Reason for stalling me. Give 2 Rotten Bandage to her. Talk to her again. Click on the Hospital Door @jump 48 76 Return to Nurse Las @jump 55 72. Talk to Village Woman @jump 64 78 and choose Ask about the hospital. Return to Nurse Las @jump 55 72. Talk to Village Man @jump 62 37 and choose Ask about the hospital. Return to Nurse Las @jump 55 72. Go to Dr. Boon @jump 210 200. Choose No. Return to Nurse Las @jump 55 72. Click on the Hospital Door @jump 48 76 Return to Nurse Las @jump 55 72. Choose Ask about Mom. Talk to Bushes @jump 54 66 and choose Ask about the Old Lady. Click on Suspicious Wooden Stick that spawns around the building. Keep clicking until you get one, two or three Lesser Agimats. Check Nurse Las if she continues its script. Return to Nurse Las @jump 55 72. Choose Go. Talk to the Bent Old Lady @jump 114 183. Choose Ask about the hospital. Talk to her again. Return to Nurse Las @jump 55 72. You will be teleported inside. Talk to the Nurse @jump 35 108, choose Go outside, then come inside again. Click on the Suspicious Wooden Stick @jump 152 23. Talk to the Nurse @jump 148 10. Return to the Nurse @jump 35 108 and choose Go outside. Return to the Bent Old Lady @jump 114 183. Talk to the Bent Shaman @jump 274 367. Return to Nurse Las @jump 55 72. Go inside the hospital. Click on the Suspicious Wooden Stick @jump 152 23. You'll be teleported out. Talk to the Nurse @jump 55 72. You gain 5 Ancient Grudge, 10 Lesser Agimat, 1 Old Purple Box. Base EXP, Job EXP. 1.)Head to port malay. 2.)Speak to the nurse outside the hospital. 3.)Head towards the Stairs and Speak to the nurse to start the Instance. 4.)After reaching 2nd floor go to every room and kill Bangungot's'Mangkukulam till they stop appearing. 5.)Warp to next room appears once all the monsters are killed. 6.)Kill Bangungot(I killed it without using Aspersio as it is solo but if you do have some scrolls use it.) 7.).After Bangungot is killed Fire Spirit appears which has to been killed in 1 min or you will repeat the whole procedure of killing bangungot again. 8.)After Fire Spirit is killed it drops loots Bangungot Doll Piece of Bangungot Spirit Ancient Grudge Bangungot Boots of Nightmare https://wiki.ragnarevival.com/wiki/Bangungot_Boots_of_Nightmare Kalasag Bangungot Card http://ratemyserver.net/index.php?page=re_item_db&item_id=4590 Video:- ------------------------------------------------------------------------------------------------------------------------------------------------------------------------------------ 1.)Speak to the Guard and Enter the instance. 2.)After sometime being on that map Buwaya will swallow you and you will find yourself in its stomach..to get out of there you will need to speak to Old Man and Women found in there. 3.)The Old Man and Women will tell you that Buwaya Weakness is on the wall,There are 2 of them. 4.)One Buwaya's'Weakness is present on the left while another one on the right. 5.)After killing Buwaya's'Weakness a warp will appear which will allow you to go out of the Box or its Stomach. 6.)Then Find the real Buwaya and kill it if you found a fake one you will be swallowed by it and then put into its belly again. (Tip:-Original Buwaya has more hp than fake ones) 7.)After Buwaya is killed a Message like this appears on top of the screen and on your chat box where the guard tells you to get back to the entrance and escape. 8.)Then finally leave the Instance. https://ratemyserver.net/index.php?page=re_item_db&item_id=2590 https://ratemyserver.net/index.php?page=re_item_db&item_id=2169 https://ratemyserver.net/index.php?page=re_item_db&item_id=4592 https://ratemyserver.net/index.php?page=re_item_db&item_id=6499 https://ratemyserver.net/index.php?page=re_item_db&item_id=6518 https://ratemyserver.net/index.php?page=re_item_db&item_id=6525 ------------------------------------------------------------------------------------------------------------------------------------------------------------------------------------ 1.)Speak to Village Chief in Port Malay at @jump 283,265,He will ask you to collect 2 Lost Belonging from Tiyanak but collect 17 of them for rest of the quest. 2.)Speak with the Missing Person's Father (malaya 270, 267) and he tells the player that the lost belongings belong tot . He then asks the player to get 7 Lost Belongings and bring them to the Missing Person's Friend. 3.)Bring them to the Missing Person's Friend (malaya 266, 274)He asks you to get 3 Lost Belongings and deliver them to the Missing Person's Son. 4.)Deliver the lost belongings to the Missing Person's Son (malaya 269, 278,),He asks you to bring 5 Lost Belonging to the Missing Person's Mother. 5.)Bring them to Missing Person's Mother (malaya 266, 284) Return to the Village Chief. 6.)He tells the you that the Young Fortune Teller seeks for their help.,Speak with the Young Fortune Teller (malaya 289, 364)8.). She asks you to hunt 15 Tikbalang..After killing Tikbalangs, return to her and she'll give you 5 Tikbalang Harnesses(Used to tame tikbalang). After killing Tikbalangs, return to her and she'll give you 5 Tikbalang Harnesses(Used to tame tikbalang). 10.)Speak with the Village Chief again. Speak with the Village Chief again. He will tell you that he needs to put traps on following order. Gruffy Worker (ma_fild01 54, 253) Grumpy Worker (ma_fild01 236, 119) Cowardly Worker (ma_scene01 177, 89) Gloomy Worker (ma_scene01 141, 118) Sentimental Worker (ma_scene01 175, 170) After setting all the traps you decide to return to the Village Chief. He thanks and rewards you with 7 Lesser Agimats, EXP & Job EXP. Now your ready to kill Bakonawa. Bakonawa Extermination 1.)The place where im standing is where Bakonawa spawns. 2)Speak to Taho so he could summon Bakonawa throwing its food into the lake,Then Bakonawa appears. 3.)After the normal Bakonawa is killed Enraged one spawns,It will have reflect so you need to use Vr or teddy baal. 4.)You will be given some time to kill Bakonawa if you didn't kill it within that time it will go inside the lake and you need to follow a ritual to Summon it,The ritual Consist of Destroying the 5will of Bakonawa and 2 Cauldrons and 2 Gongs present on both left and right side of the lakes within 5 minutes. 5.)After you have destroyed the 2 Cauldrons and 2 Gongs Bakonawa will be vulnerable again..Kill it then Treasure Chest Appears..Use a bubblegum before taking the loots. 1.)Use Wind element on Bakonawa. 2.)Use Dispell or Teddy baal card for reflect caused by Bakonawa. 3.)Use Hylozoist Card on Will of Bakonawa,Gong and Cauldrons it will help you beat the time within 5 mins. 4.)Use Detale card for Land Protector which will help you a lot against Bakonawa and its Minions. http://ratemyserver.net/index.php?page=re_item_db&item_id=969 http://ratemyserver.net/index.php?page=re_item_db&item_id=2169 http://ratemyserver.net/index.php?page=re_item_db&item_id=4591 http://ratemyserver.net/index.php?page=re_item_db&item_id=6499 http://ratemyserver.net/index.php?page=re_item_db&item_id=6516 http://ratemyserver.net/index.php?page=re_item_db&item_id=6523 http://ratemyserver.net/index.php?page=re_item_db&item_id=15051 So what is Bayani? It means slotting your Port Malay gears by making it 9+ and using 20Ancient Grudge. So how to start. Speak to the Tribe Blacksmith(ma_fild01 158,243) Give him a 9+Port Malay Equipment and 20Ancient Grudge he will slot it for you,But your Armor you traded becomes 0+refine with 1slot. Reward: Bakonawa Scale Armor (Bayani) [1] Class: Armor Defense: 5 Effect: All Stats + 2 Reduces damage taken from boss monsters by 1% per 2 upgrade levels of the item. [ Kalasag (Bayani), Buwaya Sack Cloth (Bayani), Bakonawa Scale Armor (Bayani) & Bangungot Boots of Nightmare (Bayani) set ] Maximum HP + 20% Maximum SP + 10% Reduces damage taken from Malaya monsters by 30%. Job: Every Job Requirements: +9 Bakonawa Scale Armor [0] x20 Ancient Grudge Reward: Kalasag (Bayani) [1] Class: Armor Defense: 4 Effect: Reduces damage taken from boss monsters by 1% per 2 upgrade levels of the item. [ Kalasag (Bayani), Buwaya Sack Cloth (Bayani), Bakonawa Scale Armor (Bayani) & Bangungot Boots of Nightmare (Bayani) set ] Maximum HP + 20% Maximum SP + 10% Reduces damage taken from Malaya monsters by 30%. Job: Every Job Requirements: +9 Kalasag [0] x20 Ancient Grudge Reward: Buwaya Sack Cloth [1] Class: Garment Defense: 1 Effect: Increases the recovery rate of recovery items and recovery skills by 1% per 2 upgrade levels of the item. Reduces damage taken from Water, Earth, Fire and Wind property by 10%. [ Kalasag, Buwaya Sack Cloth, Bakonawa Scale Armor & Bangungot Boots of Nightmare set ] Maximum HP + 20% Maximum SP + 10% Reduces damage taken from Malaya monsters by 30%. Job: Every Job Requirements: +9 Buwaya Sack Cloth [0] ]x20 Ancient Grudge Reward: Bangungot Boots of Nightmare (Bayani) [1] Class: Footgear Defense: 2 Effect: Mdef +1 every 2 refine level of the item. If refine level is +7 or higher, increase Movement Speed by 25%. [ Kalasag (Bayani), Buwaya Sack Cloth (Bayani), Bakonawa Scale Armor (Bayani) & Bangungot Boots of Nightmare (Bayani) set ] Maximum HP + 20% Maximum SP + 10% Reduces damage taken from Malaya monsters by 30%. Job: Every Job Requirements: +9 Bangungot Boots of Nightmare [0] x20 Ancient Grudge1 point
-
<----- The Boy Who Cried Wolfchev -----> 1.) Talk to Warpra/Kafra Warp > Dungeon > Bio Laboratory > Sewage Tunnel Entrance > Exit to the Right 2.) Arrived at Slums Area, Walk lower left till you see Jameson (297 287). ScreenShot 3.) Talk to Jameson. He will ask you if you heard him and choose "Yes I am". He will then ask you how much did you hear: answer "Everything". He will then tell you that he is looking for Dr. Wolfchev and that his information led him to the Lighthalzen Slums. Then he will ask you to help him by asking around the slums. 4.) Look for any of the following NPCs around the slums area: Note: You need 100 zeny to pay the NPC Davide - Type /navi lhz_cube 315/239 ScreenShot Ronan - Type /navi lhz_cube 327/225 ScreenShot Melinda - Type /navi lhz_cube 352/303 ScreenShot 5.) Ask those NPC if they saw Dr. Wolfchev and bribe them with 100 zeny. 6.) After receiving the information from Davide, Ronan and Melinda. Type @go 20 or @go light. 7.) You will arrived in Lighthalzen. Type /navi lighthalzen 85/302. And mouse over the ground till you see a bubble "???". ScreenShot 8.) Talk to the "???" and return to the Slum Area and Talk to Jameson. He will now tell you to Visit him at his office. 9.) Type @go 20 or @go light and /navi lighthalzen 106/245. Enter the Rekenber HQ. ScreenShot 10.) Inside Rekenber HQ. Type /navi lhz_in01 88/213, enter the portal and then /navi lhz_in01 113/49. You will now see Jameson. 11.) Talk to Jameson. He will thank you for your help and ask you to talk to his colleagues. <----- Breaking of the Seal -----> 1.) Talk to Paige just near Jameson. 2.) She will ask you to collect the 4 Sealing Runes in Juperos Ruins 1, Glastheim Castle 2, Odin Temple 2 and Shrine Sacred Precinct 3. Note: Make sure your /effect is on before you go looking for the Sealing Rune. 3.) Use Warpra/Kafra to warp into those 4 locations. Sealing Rune location in map changes every 4 hrs. You need to collect all 4 Sealing Runes. Juperos Ruins - Warpra > Dungeon > Juperos > Juperos Ruins 1 Glastheim Castle - Warpra > Dungeon > Glastheim > Glastheim Castle Level 2 Odin Temple - Warpra > Dungeon > Odin Shrine > Level 2 Shrine Sacred Precincts - Warpra > Dungeon > Shrine Sacred Precincts > Level 3 4.) Roam around this 4 Maps till you notice a sparkly Aura that envelops you, which means the Sealing Rune is near. Mouse over the ground till you see "Sealing Rune". ScreenShot Note: Use characters that can Run fast or has Teleport. 5.) After collecting all 4 Sealing Runes, retrun to Paige. She will then give you 4 Seal Shrine Location to put those Sealing Runes. List of Seal Shrines: Amatsu Dungeon 3 - /navi ama_dun03 180/49 Anthell Dungeon 2 - /navi anthell02 208/112 Geffen Field 10 - Warpra > Dungeon > Orc Dungeon 1 > Exit Portal > Exit Bldg > /navi gef_fild10 131/121 Glastheim Churchyard - Warpra > Dungeon > Glastheim > Churchyard > /navi gl_chyard 148/151 Hidden Dungeon/Maze 3 - /navi prt_maze03 179/177 Payon Dungeon 5 - /navi pay_dun04 121/111 Pyramid Dungeon 4 - /navi moc_pryd04 101/184 Niflheim - @go 13. /navi niflheim 87/85 Sphinx Dungeon 5 - /navi in_sphinx5 95/135 Turtle Palace/Dungeon 3 - /navi tur_dun04 99/86 West Orc Village - Warpra > Dungeon > Orc Dungeon 1 > Exit Portal > Exit Bldg > /navi gef_fild10 27/218 > /navi gef_fild14 66/77 Sograt Desert - @go 1 > /navi morrocc 160/18 > /navi moc_fild12 118/30 > /navi moc_fild18 380/305 > /navi moc_fild17 219/311 Mt. Mjolnir - @go 6 > /navi aldebaran 138/35 > /navi mjolnir_12 220/27 > /navi mjolnir_05 16/171 > /navi mjolnir_04 178/195 Payon Forest - @go 36 > /navi payon 122/30 > /navi pay_fild01 353/17 > /navi pay_fild02 18/175 > /navi pay_fild11 165/235 For @jump users Breaking The Seal.txt 6.) P aige will pick 4 location randomly from those list. Then you visit those location and put the Sealing Rune. ScreenShot 7.) After placing all 4 Seal Runes into Seal Shrines, go back to Paige. She will the tell you to talk to Jameson. 8.) Talk to Jameson. He will thank you for your help and ask you to visit the Chief Constable. 9.) Type @go 20 then /navi lighthalzen 234/276, etner the bldg and you will find Chief Constable and Constable. Chief Constable is the one who accepts Donation. Either Credits or Zeny. And then you will gain points which you can use to buy Antique Gears at the Rekenber HQ Steward NPC. (Chief Constable will only accept Donation when Bio Laboratory 4 is Open) Constable Nobber is to check if the donation period is full. 10.) You can go back to Paige to repeat Breaking of the Seal to help the community finish 50 times Breaking of the Seal Quest. Once the quest hits 50 times, Bio Laboratory 4 will Open. And Chief Constable will start accepting Donation. 500 Premium Points / 5c = 1 Antique 500,000,000 Zeny = 1 Antique You can only have 1 of each piece. A full set Antique will cost 25c or 2500 premium points or 2,500,000,000 Zeny. 11.) To purchase Antique, Head back to Rekenber HQ, where Paige is. Look for Steward NPC. Possible effect of Antiques https://wiki.ragnarevival.com/wiki/Antique1 point
-
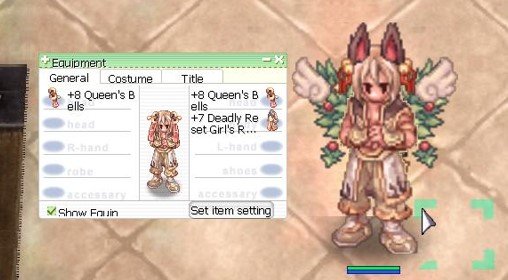
------------------------------------------------------------------------- SugarFree’s Guide to Hermes Holiday ------------------------------------------------------------------------- IGN: SugarFree , McFlurry, BipolarBear, Snapple Hermes Holiday is one of the 3 quests in RDC tier 2 ---------------------- Requirements: ---------------------- Party with 3 - 5 members (each must be eligible to Tier 2 RDC Quest) 1 Operation Ticket on each party member ----------------- Mechanics: ----------------- Your main task is to deliver the letters within 15 minutes limit. You will start with 15 letters needed to be delivered to specific mailboxes. There are a total of 22 mailboxes. Each mailbox has one letter that needs to be taken and delivered to another mailbox. Note: Every wrong Address will increase the counter of letters needed to be delivered, so pay attention!!! -------------- Location: -------------- The map is a mirror of Gonryun Field 01(gon_fild01) There are a total of 7 areas: Temple Road 2 Mailboxes Rural Bend 3 Mailboxes Main Street 5 Mailboxes Safari Lane 2 Mailboxes Coal Mine only 1 Mailbox Windmill way only 1 Mailbox Port Bluff 8 MailBoxes --------------------------------- Equipment and Stats: --------------------------------- Upper & Mid : Queen's Bell - Immunity to Stone Curse, Sleep, Stun Armor : Any Armor with Evil Druid Card - Immunity to Freeze & Stone Cursed / or Any Unfrozen card Cursed can be countered by Blessing Skill DEX: total 150 for instant cast AGI: until ASPD 196 for maxed attack speed INT: for Maxed SP STR :for weight capacity to carry Berries or Blue pots The main reason why I recommend using a Champion class because of the skill Body Relocation, With Immunity-to-status gears,means you can navigate the whole maps with ease and faster. Basically, just spam Body Relocate and past all the traps and plants. PROTIP: Don't pick up the letters from the mailboxes if the address is too far, you have an option to refuse. Make sure to check the addresses of other mailboxes like Port Bluff which has 8 mailboxes, chances are the address would be on the same location. If for some reason you deliver the last letter at the same time with a party member and the counter says you need to deliver -1 more, just deliver a letter to the wrong address and the counter will go back to zero and you complete the instance. Speed is the key, the longer you are in the instance the more traps will spawn! -------------- Rewards: -------------- "You successfully completed the operation" head back to the starting point and check the Treasure Chest Plant-Type Cards (Scorpion, Hermit Plant, etc.) Moonlight Flower Card Heartwood Corvo Hermes Sandals Black Messenger Bag Blue Messenger Bag Cyan Messenger Bag Gold Messenger Bag Green Messenger Bag Purple Messenger Bag Red Messenger Bag White Messenger Bag Constructive criticism and feedbacks are all welcome, Happy Gaming!
 1 point
 -
Are you hungry yet? ========== Sara's Memory ... and you ========== Sara's Memory is a customized instance and part of the Dali update. https://community.ragnarevival.com/index.php?/topic/420-maintenance-notesmajor-2018-05-11-dali-update/&tab=comments#comment-1591 IGN: yandereQueen, g c q, Scilla, and many more ========== How to go there? ========== Go to Eden (@go Eden) and you will see a giant hole in wall, take the portal in the end. You will be on the Dali map, Sara's Memory is the first on the top right side (/navi dali 136/115). ========== The Instance ========== Talk to Leon the Adventurer, he will let you revisit the past of Sara. Use the Dimensional Gate to warp into the instance. NOTE: it is a solo instance, however the NPC wants you to be in a party. Just make one for yourself. Another NOTE: You can use Premium items in the instance, however Angra and Ahura are not allowed. Main goal of the instance is to experience what happen to Sara, you follow the story line and kill all enemies in the way. There isn't really a main goal you can farm for like in Ghost Palace, the monsters in there all drop various food items (low level ones mostly), probably the only decent one being the MVP Irene Elder dropping Lv10 foods and Cookbook. ========== The Monsters ========== The instance has 4 kinds of monsters and 1 "MVP". All Soldiers are aggressive, the Guard Dogs only attack if you hit them. You need to kill them all nonetheless. Food Lvl: 3 Food Lvl: 5 Food Lvl: 4 Food Lvl: 6 Food Lvl: 10 ========== Gears & Consumables ========== I used High Wizard for the instance due to the nice AOE they naturally provide. Note: the Accessory cards are whatever, I just used most of my farming equipment (lol). Dark Wizard Hat [4] / Any of the Matk giving Event gears - Event Headgears should work as well as cheap alternative. Rose Ring [4] / Large Blue Angelwing [1] - LBW as cheap alternative, also nullifies Gemstones. Planet Orbs [1] / Scarlet Angel Ears [1] - Scarlet Angel nullifies Gemstones, handy to spam Safety Wall. Tidon [1] - Any Armor goes, this was just my default GR one. Nidhoggur's Shadow Garb [1] - Any Garment goes. Ebony Greaves [1] - Any Boots goes. Lich's Bone Wand [2] - Easy to obtain. Immune Shield [1] / Strong Shield [1] - Strong Shield Provides no knockback, handy against Irene Elder. Resplendent Ring [1] / Asomatous Ring [1] Garment: Deviling Card - 50% Neutral Resistance. Armor: Grand Ghostring / Ghostring Card - Enchants Armor with Ghost. Footgear: Fallen Bishop Card - Increase damage to Demi-Human by 50%. Shield: Thara Frog Card - Reduces damage from Demi-Human by 30%. Headgear: Evil Snake Lord Card - INT +3, Immunity to Curse. Rata Card - Matk +220. Chance to increase Flee +100 for 4sec when using Magic. Weapon: Zakudam Card - Increase Magic damage to Demi-Human by 5%. Optional: Hill Wind Card - Increase damage with Thunderstorm, Jupitle Thunder and Lord of Vermillion by 5%. Accessory (all optional, since a lot monster spawn, you can put any card that maybe drops you something useful): Plasma Card - Chance to drop a "Proof" Potion when killing monsters. Pancake Card - Chance to drop a Pancake when killing monsters. Consumables: Yggdrasil Berry, Reraise Potion (in case something goes wrong) Skills: Energy Coat, Amplify Magic Power, Storm Gust, Jupitle Thunder (JT), Lord of Vermillion (LoV), Safety Wall (Tho Irene can push you back, you will need immunity to that to use SW properly) The basic get go is, you spam Storm Gust on the monster waves, they all freeze. Then you can either LoV them, or pick them one by one with JT. Basically the same goes for Irene, tho he doesn't freeze. Spam JT on him and keep an eye on your HP to use a Berry if needed. If you got knock back immunity, you can also keep Safety Wall on yourself to save some Berries. Items that prevent knock back be Strong Shield, or Bronze Greaves. ========== Walk through ========== The Instance map is a copy of Payon Town. You will meet Sara who is waiting in Payon for her father. After her dialog with her father, move to the portal. The instance will be always like that, the portals you need to go to will be marked with a green arrow on the map. - You find Sara and witness wit her the murder of her mother, you need to escape with her. The system Alarm will go off and the first guards and dogs will spawn, kill them. Make sure you kill everything in section you are in currently. Sara will keep spawning on the way, guiding you. Once you cleared the area, a message appears and a new portal opens. This will repeat a few times. Final Section will be when the message pops up that Sara went up again 12 o'clock In the last section you finally get to catch Sara. A dialog happens again between you, her and her father. Soldiers will spawn. Once they are killed, Irene Elder will spawn immedatly, so be prepared before you enter the cut scene. He uses mostly FSK and Palm Push, but shouldn't be that much of a problem. Keep some Berries on hand in case your HP grain too quick. Once you finish talking with him, chase Sara one last time. When you find her, strangers will take her away. The instance will be over with that.1 point
-
Hall of Abyss Farming Guide as Stalker The Hall of Abyss is a map that uses guild point system to allow the purchase of equipment. This means that you kill the monsters in the map to demonstrate your ability and gain points that you can use to buy equipment. For more information you may check out the guide in the wiki page: Hall of Abyss Stalker is a fun and exciting job as they are very versatile and can use different types of weapons and strategies both in PVM and PVP. As a stalker, you can use weapons, such as Daggers, Swords, Bows, and Shields. You also have the skill to copy by using Plagiarism and Preserve. If you want to experiment with different builds and skills, this is the job for you. It’s the jack of all trades when it comes to skills and weapons. I’ll admit, I’m not super knowledgeable in utilizing all the builds but I want to share how fun it can be and leave you to experiment. You may check out other guides for builds which I will post after this guide for more information. IGN: Breadpan, Yummy, Breadstix, Loafy, etc. A. Magic Type Build Magic type build for stalkers is quite good and challenging. They are not as strong as a wizard but can use different tactics to their advantage. This build just demonstrates how versatile stalkers can be. You will however, need to copy and Plagiarize and Preserve some magic skills for your wizard friends. Skills to Copy: Storm Gust – Level 10 - easier to cast and has a large area of effect Jupitel Thunder - Level 10 - focused on one mob at a time Crimson Fire Blossom -Spammable fire elemental magic First wind -for Payon, has AoE effect Stats: Str – 100-150 For carrying potions because you will need more of it Agi – 100-150 For movement speed Vit – 100-150 For defense of attacks Int – 255 Max, the more the better, because this is where your magic comes from Dex – 150 for instant cast of spells Equipment: Upper 2 Slot Headgear such as Bunny Balloon Hat or similar with 2 Rata Cards Satin hat / Flax hat / Cashmere hat Magical Feather - additional matk, can be obtained with this quest RDC Helm with stats for Magic Builds (Int and Dex) with 4 Rata Cards 4 slot Premium Headgear, all stats +30 with 4 Rata Cards Middle Large Blue Angelwing – with Orc Hero Card as you can easily be stunned by sonic blows from mobs Golden Wings Slotted Mid with additional Magic Attack such as Icicle Wings with 1 orc hero and 1 marduk card, you may also put Orcish Spirit Card for Ninja 4 slot premium headgear all stats +30 with 4 Rata Cards Lower Black/Orange Tie – additional magic attack Honorary Bunny Mouth – immunity to silence Blue Necktie with Rata Card / Orcish Spirit Card( for ninja skills) Premium +15 stats Armor Great Old Hauberk Armors from Tailoring such as Satin, Cashmere, or Flax Garment Great Old Cloak Garments from Tailoring such as Satin, Cashmere, or Flax Heroic Backpack with any card such as Raydric Shield Valkyrian Shield or Antiquated Shield with Alice Card Footgear Great Old Boots Slotted Footgear with Fallen Bishop Hibram Card (for damage against demi-human), Dark Lord Card (autocasts Meteor Storm), or Kiel Card (faster casts) or Moonlight Flower Card (faster walking) Tenebrous Boots – 7% Matk Accessories Resplendent Rings– with Scaraba Card Ring Des Nibelungen or Seth’s Wrath or similar - with Scaraba Card +5 Sapphire Ring Slotted accessory with Sewer Bug Dame Card to enable the use of Warp skill Weapon Creakyboom Card – 4% magic attack +10 Black Wing with card above 3-4 slotted Sword or Axe with 3-4 card/s– Just because it has slots Faceworm Leg with Creakyboom -10% matk Elemental Sword – 3 slots Which Hall of Abyss: I believe the best Hall of Abyss for magic type users is the Ancient Wind, located in Payon, Greenwood Lake (pay_gld): 206, 190. It is not as spacious as the other maps perfect of cornering mobs and hiding. The map is a mirror of gld2_pay. Strategies: Make your way to the Hall of Abyss and start killing the mobs like Skeleton General, Am Mut, Gajomart, PIamette, Soheon and Daehyon with magic attacks. For this guide I’m featuring the use of Storm Gust. You can make use of other skills like Jupitel Thunder, or ninja skills like North wind. The strategy is to cast storm gust and make the monsters chase you while they go through it. Do this multiple times by running around all over the place. When you are getting mobbed it’s best to use backslide and live to fight for another few minutes. When you are low in SP and HP, sit in a corner to regen as you do not have the life-steal. Be sure you pick up the authoritative badges (alootid 662 & 12262) Soheon drops, it comes in handy in increasing your movement speed. Be patient and after a while you will get the hang of it! Storm gust! Freeze those pesky mobs! Chilling for hp regen B. Bow Type Build Bow type build for stalkers is also very effective and fun to experiment with because you can play around with skills. They are not as strong as Snipers when it comes to ranged damage but is still very viable. You can also add additional range damage for stalkers by adding skill points to Vulture’s Eye to increase your range and hit rate. Even though you do not have a falcon, you can use other skills to deal damage and annoy opponents. Imagine using the bow, but being able to switch weapons to strip enemy armor, or having a fast get-away using backslide and chase walk/ stealth. You can also make use of copying the right skills from other jobs such as Storm Gust, Bowling Bash, Grand Cross, etc. Skills Needed: Vulture’s Eye – Level 10 – for additional range Double Strafe – Level 10 – for sniping mobs Reject Sword - works on monsters too Raid – Level 10 – for crowd control Skills to Copy (you may copy only one at a time): Bowling Bash – Level 10 – equipping arrows of different elements can change the element of your attack Storm Gust –Level 10 – for additional damage,good for halting and crowd control too Other skills you like Stats: Str – 100-150 Enough to carry arrows, potions, and loots Agi – 120-160 Enough to read 196 ASPD Vit – 100-150 Enough to survive and not be like paper Int – 100-150 Enough for defense against magic attacks Dex – 255 Max, the more the better, as this is where your damage comes from Equipment: Upper Drooping Amistr – The best because you have life steal and additional damage 2 Slot Headgear such as Bunny Balloon Hat or similar with 2 Dark Pinguicula Cards RDC Helm with 4 Dark Pinguicula Cards 4 slot Premium Headgear, all stats +30 with 4 dark Pinguicula Cards Middle Large Red Angelwing – with Orc Hero Card Slotted Mid with additional attack 4 slot premium headgear all stats +30 with 4 Dark Pinguicula Cards Lower Black/Orange Tie – additional attack Froggy Rucksack Red Necktie Premium +15 stats Cards: Kiki Card - for more crit Armor Alligator Leather Suit Great Old Hauberk Garment Alligator Leather Cloak Heroic Backpack with Anunaki Card Footgear Alligator Leather Sandals Ebony Greaves with Ascendent Orc Card or Nekoring Card Fey Boots Accessories Recondite Rings – with Implosion Cards you may add additional Dex+3 orbs Ring Des Nibelugen or similar that adds attack Slotted accessory with Sewer Bug Dame Card to enable the use of Warp skill Weapon Goblin Bow – with 2x Turtle General Card or Aunoe Cards Thanatos Bow – with 2x Turtle General Card or 2 Abysmal Knight Cards Spectral Bow – 2x Abysmal knight, Turtle General Card, Randgris Card Which Hall of Abyss: For Stalkers with bow type build you may want to try the Hero’s Tears, located in Aldebaran (191, 162) Why? Because there are lots of open spaces, perfect when you need to get away. Mobs here are easier to kill with bows. The map is a mirror of gld2_ald. Strategies: Make your way around the map killing Gioia, Elvira, Centipedes, Owls, Piamette, and Hornets. Bring Stone and shadow arrows. The Hall of Abyss mobs are thana-bait, meaning the higher the vit the more damage you will do to them using Thanatos weapons. Switch to Shadow Arrow when faced with Elvira and Gioia and Stone Arrow for the rest. When you are getting mobbed proceed to use crowd control skills such as Storm Gust and Bowling Bash to knockback enemies and make a quick escape using backslide. Sadly Chase Walk is not as effective here as the Hornets and Centipedes will still detect you. Drooping Amistr is your best friend! The more you attack the more chance you get healed with life-steal. Keep killing and gaining points, you will get the hang of it in time! Set (@autoloot 1) and add the following to alootid; Royal Jelly (ID 526), Gold (ID 969), Green Herb (ID 511) What to Farm for: Since the Hall of Abyss uses guild point system you will need to accumulate points by killing mobs in order to be able to buy from the TAGRAS shop. You can check this link to the TAGRAS Catalogue. The following are my recommendations from the list: · Saint Vincent’s Saber - You’ll never know when you want to be a sword swinging stalker instead, it also has life steal which is always useful for close range combat · Reset Girl’s Robe – All around armor · Healer’s Heart Hat – 10% Demi-Human Resist Consumables: Panacea - to remove poison and curse Green Potions/Green Herb – to cure poison (faster than Detoxify) Blue Pots – for sp regeneration Condensed white potions – for hp regeneration Speed Potion – for fleeing mobs Blue Gems - for warping yourself HOA Etiquette: Remember that HOA is a PvP map. Avoid killing other players and apologize when you do. Also avoid kill stealing mobs of others. Additional Guides: https://strategywiki.org/wiki/Ragnarok_Online/Jobs/Stalker http://write.ratemyserver.net/ragnoark-online-character-guides/stalkerrogue-guide-mostly-stalker/ Thank you for reading the guide! Thank you to my friends who answered my questions about equips and to the ones who helped write the guide (thankies for corrections and linking hehe)! Comments and suggestions are welcome. If you think there are better builds, equips, and strategies, feel free to comment and we can discuss as I would also like to learn more. Happy Farming!1 point
-
Bump for this thread! Nice guide! Long Live Stalkers!!1 point
-
Cool guide! Stalkers are the best1 point
-
And I thought you laugh at people that die from you /jk Nice guide, I really like the format, it looks very clean and not messy. :31 point
-
----------------------------------------------- CALLING BISHOP HIBRAM ------------------------------------------------ IGN: SugarFree, Mcflurry, Snapple CALLING BISHOP HIBRAM is one of the 3 quests in RDC tier 2 ---------------------------------------- Requirements: ---------------------------------------- Party with 3 - 5 members (each must be eligible to Tier 2 RDC Quest) 1 Operation Ticket on each party member -------------------------------------- Mechanics: ------------------------------------- Your objective is to search and kill the Fallen Bishop Hibram randomly roaming at the map,the map is filled with Banshees and don't even bother to kill them because they will just keep respawning across the map. If you found and killed the Fallen Bishop, he will summon multiple Fallen Bishop, among them is the real one. Once you have killed him, head back to the starting point and claim your rewards. ------------------------------------------ Location: ---------------------------------------- The map is a mirror of Nameless Island 01(nameless_n) --------------------------------- Equipment and Stats: --------------------------------- Use Any armor with Bathory Card or Great Demon Robe while roaming for immunity to Banshee's Soul Strike otherwise you'll flinch. When you found FBH, Switch into your armor that has Angeling or Gloom Card and spam Desperado, Voila.."You successfully completed the operation". Head back to the starting point, the Treasure Chest Reward is waiting for you. ---------------------------- Rewards: -------------------------- Banshee Card Fallen Bishop Hibram Card Falling Bishops Ghost Asomatous Ring Constructive Criticism and Feedbacks are all welcome, Happy Gaming!
 1 point